Noren Size Guide: Choosing the Perfect Japanese Curtain Width
Understanding Noren Dimensions: Standard, Long, and Custom Sizes
Choosing the right size noren (暖簾) is crucial for both aesthetic appeal and practical function. More than just a decorative accent, a noren serves as a subtle room divider, a shop sign, or even a privacy screen. Whether you are aiming for a traditional Japanese aesthetic or incorporating a noren into a modern space, understanding its dimensions is the first step. Let's delve into the world of noren sizes, exploring common measurements, design considerations, and how to find the perfect fit for your needs.
Common Noren Widths: Standard Doorways vs. Wider Openings
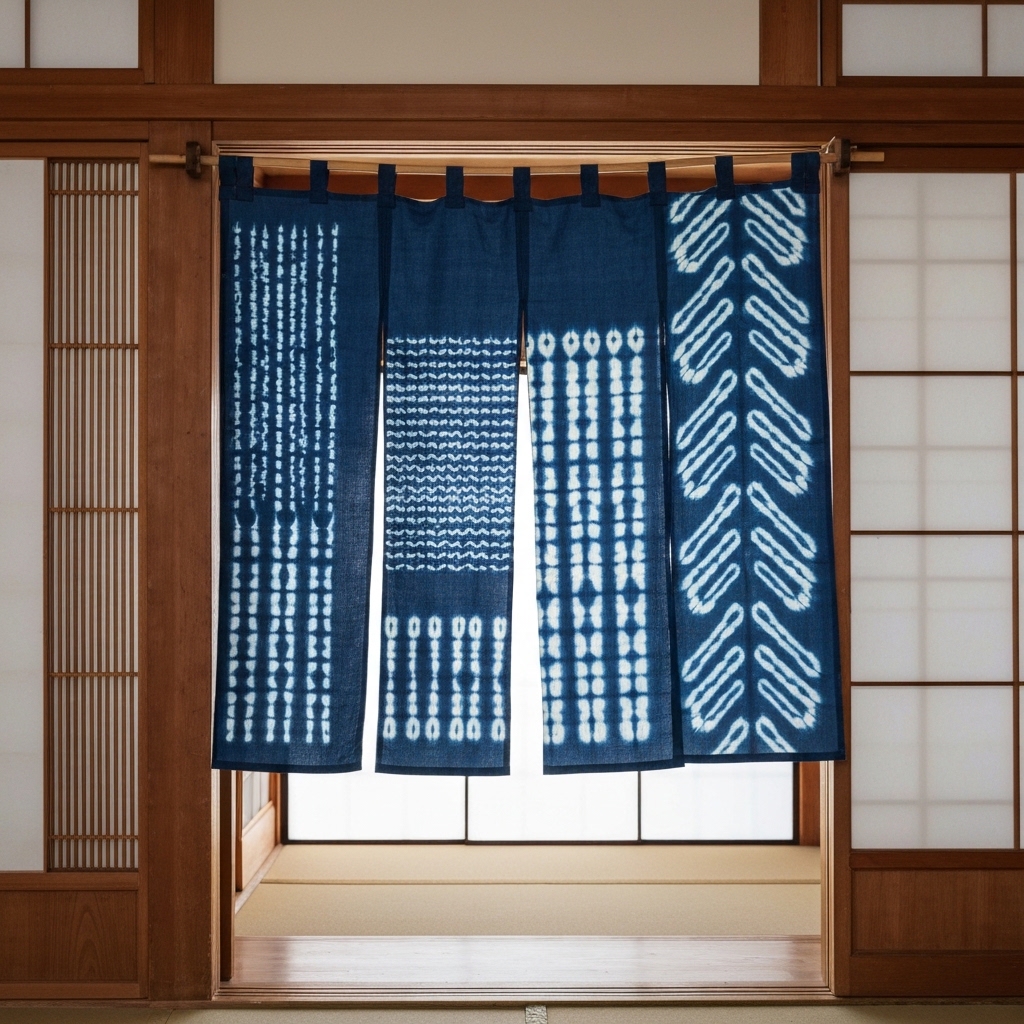
In Japan, noren are commonly seen adorning the entrances of businesses, restaurants, and even private homes. For standard doorways, widths typically range from 85 cm to 90 cm (approximately 33.5 inches to 35.5 inches). This allows for a slight gathering of the fabric when hung, creating that characteristic rippled effect. The standard width is intended to comfortably cover a typical Japanese doorway frame, while still allowing easy passage.
However, you'll also encounter noren designed for wider openings. These can range from 110 cm to 150 cm (approximately 43 inches to 59 inches) or even wider. These wider noren are often used in larger establishments, such as restaurants with wide entrances or shops wanting to create a more dramatic and inviting storefront. They can also be employed within a home to separate larger living spaces, perhaps between a living room and dining area. When considering a wider noren, it's important to factor in the desired amount of gathering. More fabric will result in deeper pleats and a more visually textured appearance.
It's worth noting that many older homes and traditional shops may have doorways that deviate from modern standardized sizes. In these cases, careful measurement becomes especially important. A custom-made noren might be the best option to ensure a perfect fit. This is a very common request at workshops specializing in traditional dyeing techniques like aizome (藍染め, indigo dyeing) or katazome (型染め, stencil dyeing).
The number of vertical slits, or kireme (切れ目), also contributes to the perceived width and overall aesthetic. A noren with fewer, wider slits will appear more substantial, while one with more, narrower slits will have a lighter, airier feel. The slit placement also affects how the noren parts when you walk through it. Some noren have slits that run nearly the entire length, while others have only a short slit at the bottom, maintaining more privacy.
Noren Length: Floor-Length, Half-Length, and Custom Options
The length of a noren significantly impacts its function and aesthetic. Noren lengths are commonly described as either floor-length or half-length, though custom options are, of course, available.
-
Floor-Length Noren: These noren typically reach from the top of the doorway or hanging point down to just above the floor. While not as commonly seen in commercial settings, floor-length noren can create a dramatic and elegant effect in residential spaces. They can be particularly effective for dividing rooms or covering storage areas. However, it's important to ensure they don't drag on the floor, which can lead to wear and tear and become a tripping hazard.
-
Half-Length Noren: Also known as a short noren curtain, this is the most common type, ending roughly halfway down the doorway. A half-length noren offers a balance of privacy and openness. They allow for airflow and some visibility while still subtly defining the space. You’ll see them everywhere from ramen shops to family restaurants, often displaying the shop's name or logo. In a home, a half-length noren can be used to partially conceal a kitchen entrance or add a decorative touch to a hallway.
-
Custom Length Noren: When standard sizes don't suffice, opting for a custom-length noren ensures a perfect fit. This is especially important when working with unusually tall or short doorways, or when you have a specific design vision in mind. Many artisans and workshops specializing in fabrics like asa (麻, hemp/linen), momen (木綿, cotton), or even kinu (絹, silk) are happy to create custom noren to your exact specifications.
Consider the function of the noren when deciding on the length. A noren used to block sunlight might be longer than one used purely for decoration. Also, think about the overall proportions of the space. A very short noren in a tall doorway might look out of place, while a very long noren in a small space might feel overwhelming.
Calculating the Ideal Noren Size for Your Space
Accurate measurement is paramount when selecting the right noren size. Before purchasing, take careful measurements of the doorway or opening where you plan to hang the noren.
-
Measure the Width: Measure the width of the doorway opening. This is the distance between the two sides of the door frame. Add extra width (typically 10-20 cm or 4-8 inches) to allow for the desired gathering or pleating effect. For example, if your doorway is 80 cm wide, you might choose a noren that is 90-100 cm wide.
-
Measure the Height: Measure the height from the top of the doorway (where you will hang the noren) to the floor. Decide whether you want a floor-length or half-length noren. For a half-length noren, you might choose a length that is approximately half the height of the doorway, or slightly longer or shorter depending on your preference. Remember to account for the saotooshi (竿通し, rod pocket) at the top, which will reduce the visible length slightly.
-
Consider the Hanging Method: The method you use to hang your noren will also affect the final length. If you are using a tsuppari-bou (突っ張り棒, tension rod), the noren will hang slightly lower than if you are using hooks or nails.
-
Visualize the Result: Before making a final decision, try to visualize how the noren will look in the space. You can even use a piece of fabric or paper to mock up the size and shape of the noren. This will help you ensure that the proportions are correct and that the noren complements the surrounding décor.
Expert Insight: When in doubt, err on the side of a slightly wider noren. You can always adjust the amount of gathering to fine-tune the appearance. A noren that is too narrow will look stretched and awkward, while a slightly wider one will always look more relaxed and inviting.
Impact of Gathering/Pleating on Effective Width
The intentional "gathering" or pleating of a noren significantly impacts its effective width and overall appearance. As we've touched on, this refers to the amount of extra fabric that is used relative to the width of the opening.
-
Minimal Gathering: If the noren width is very close to the doorway width, there will be minimal gathering. The fabric will hang almost straight, with very little pleating. This can create a clean, modern look, but it may also feel less traditional.
-
Moderate Gathering: Adding 10-20 cm (4-8 inches) to the doorway width results in moderate gathering. The fabric will form soft pleats, creating a more relaxed and inviting feel. This is a common choice for both residential and commercial settings.
-
Significant Gathering: Adding 30 cm (12 inches) or more to the doorway width creates significant gathering. The fabric will form deep, pronounced pleats, resulting in a richer, more textured appearance. This is often seen in traditional Japanese settings and can add a touch of elegance and formality.
The amount of gathering also affects the degree of privacy offered by the noren. More gathering means that the fabric will cover the opening more completely, reducing visibility from one side to the other. However, even with significant gathering, the slits in the noren will still allow for some visibility and airflow.
It's important to consider the weight of the fabric when deciding on the amount of gathering. Heavier fabrics, such as thick cotton or linen, will naturally form deeper pleats than lighter fabrics, such as silk or sheer synthetics.
Ultimately, the ideal amount of gathering is a matter of personal preference and depends on the overall aesthetic you are trying to achieve. Experiment with different widths to find the look that best suits your space and your style.
Noren Header Construction and Size Considerations
The header of a 暖簾 (noren) often goes unnoticed, yet it is the linchpin holding the entire piece. Its construction dictates how the noren hangs, its durability, and, to some extent, its aesthetic appeal. Careful consideration of the header is crucial, especially when dealing with custom sizes or heavier fabrics. It's not merely about sewing a fold; it's about engineering a robust and visually integrated component.
Rod Pocket Dimensions: Diameter and Depth Requirements
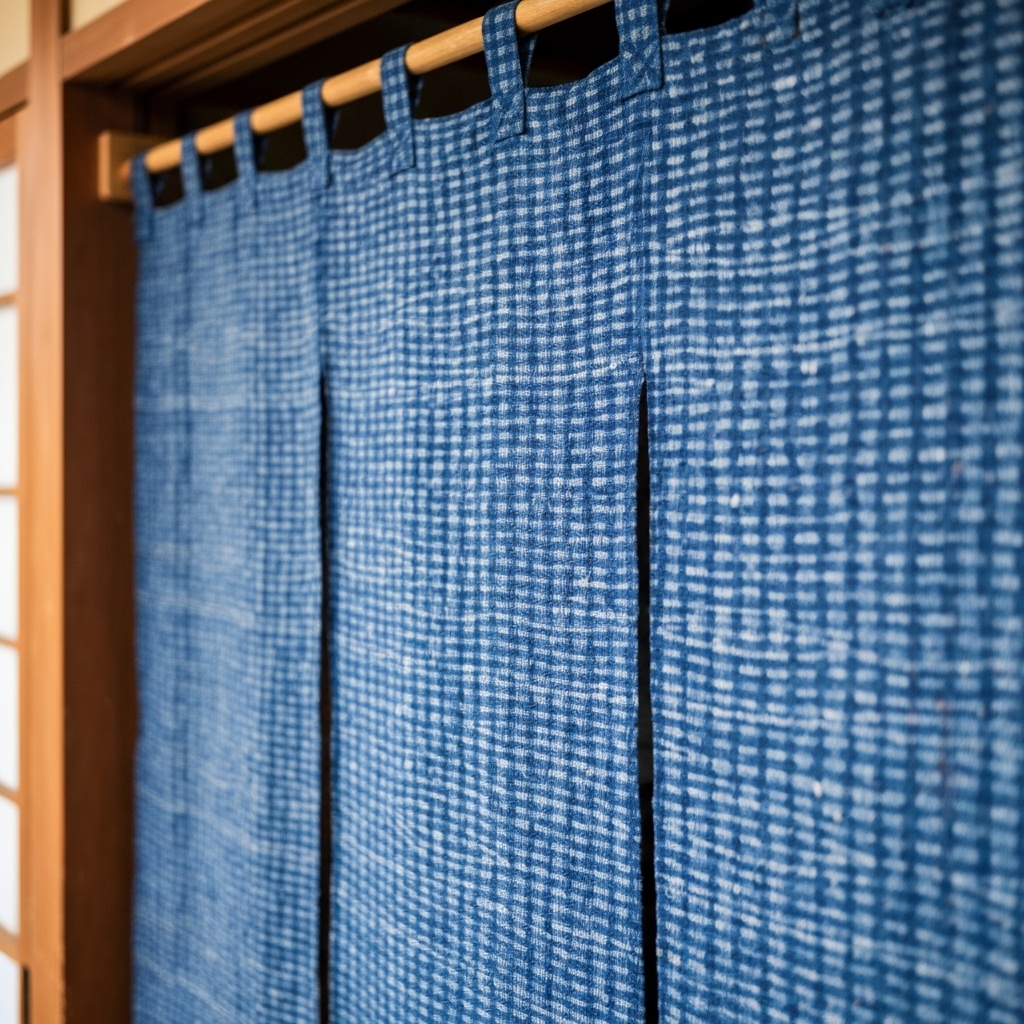
The 竿通し (saotooshi), or rod pocket, is a critical feature, influencing both the functionality and appearance of the hung 暖簾 (noren). Its dimensions should be carefully considered in relation to the intended hanging rod or method. While a standard diameter is often sufficient, variations in rod size or the desired drape effect may necessitate adjustments.
The diameter of the rod pocket should, of course, exceed the diameter of the rod being used. A general rule of thumb is to add at least 1 cm (approximately 0.4 inches) to the rod's diameter to ensure easy insertion and movement. However, simply accommodating the rod's diameter is not enough. The goal should be smooth gliding and minimal friction. For instance, a rod with a diameter of 2.5 cm (1 inch) would ideally pair with a rod pocket having a diameter of at least 3.5 cm (1.4 inches). If the fabric is particularly thick or stiff, allowing for even more clearance becomes beneficial.
The depth of the rod pocket – the amount of fabric folded over to create the pocket – also plays a significant role. A deeper pocket provides more stability and prevents the 暖簾 (noren) from sagging unevenly. A common depth is around 5-7.5 cm (2-3 inches). For lighter fabrics like thin 綿 (men/cotton fabric), a shallower pocket of 4 cm (1.6 inches) might suffice. But for heavier materials, such as thicker 木綿 (momen/cotton) or 麻 (asa/hemp/linen), increasing the depth to 7.5-10 cm (3-4 inches) is advisable. A deeper pocket distributes the weight more evenly across the rod, reducing stress on the stitching and fabric.
Consider also the finish of the rod itself. A rough or unfinished wooden rod will create far more friction than a polished metal rod. This friction directly impacts the smooth cascading effect desired. In the case of a high-friction rod, further increasing the diameter allowance is prudent.
Finally, think about the visual impact. A rod pocket that is excessively large can appear bulky and detract from the overall elegance of the 暖簾 (noren). Achieving the right balance between functionality and aesthetics is key.
Expert Insight: When creating your own rod pocket, use a strip of interfacing or fusible webbing along the fold line. This will add structure and prevent stretching, ensuring the rod pocket maintains its shape over time.
Tie Options: Length and Placement for Secure Hanging
While rod pockets are traditional, tie options offer an alternative, often more flexible, method for hanging 暖簾 (noren). Ties allow for adjusting the height and creating different draping effects. Choosing the right tie material, length, and placement is key to both functionality and aesthetics.
Common materials for ties include fabric strips (often the same fabric as the 暖簾 (noren) itself), cotton twill tape, or even decorative cords. The length of the ties depends largely on the desired hanging style and the height of the doorway or space where the 暖簾 (noren) will be displayed. Generally, ties should be long enough to allow for a secure knot or bow, with some extra length for adjustment. A good starting point is to make each tie approximately 30-45 cm (12-18 inches) long. This allows ample room for various tie styles and adjustments.
Placement of the ties along the top edge of the 暖簾 (noren) is critical for even weight distribution and a pleasing drape. Typically, ties are spaced evenly across the width of the 暖簾 (noren), with one tie near each edge for stability. The number of ties needed depends on the width of the 暖簾 (noren) and the weight of the fabric. For a standard 85 cm (33.5 inch) wide 暖簾 (noren), 3-5 ties are usually sufficient. For wider 暖簾 (noren), increasing the number of ties to 5-7 ensures even support.
Consider reinforcing the attachment points of the ties to the 暖簾 (noren). This can be done by using a small patch of sturdy fabric behind each tie, or by reinforcing the stitching with a zigzag stitch or backstitch. This prevents the ties from tearing away from the fabric over time, especially with heavier materials.
The method of attachment also influences the overall look. Ties can be sewn onto the front of the 暖簾 (noren) for a more visible, decorative effect, or they can be attached to the back for a cleaner, more minimalist look. The choice depends on the desired aesthetic. For a rustic or folk-art style, visible ties can add charm. For a more modern or refined look, hidden ties might be preferable.
Hidden Stitching Techniques for Header Reinforcement
Regardless of whether you opt for a rod pocket or ties, hidden stitching techniques are vital for reinforcing the header and ensuring the 暖簾 (noren) can withstand the rigors of daily use. These techniques provide added strength without compromising the overall aesthetic.
One common method is to use a technique known as "understitching." This involves stitching the facing (the fabric used for the rod pocket or tie attachments) to the seam allowance of the main fabric. This helps to keep the facing from rolling to the outside and provides a crisp, clean edge. It also adds an extra layer of reinforcement to the seam.
Another effective technique is to use a double-stitched seam. After sewing the initial seam, a second row of stitching is added close to the first. This provides additional strength and prevents the seam from unraveling. For heavier fabrics, a triple-stitched seam may be necessary. The color of the thread should match the fabric closely so that the stitching remains discreet.
A particularly valuable technique, borrowed from traditional Japanese garment construction, is utilizing a small strip of 木綿 (momen/cotton) tape, folded in half, and sewn into the header seam. This acts as a binding, distributing stress and significantly increasing the header's resistance to tearing or stretching. This is especially important with lighter 麻 (asa/hemp/linen) fabrics that may be prone to fraying.
Furthermore, consider the stitch length. A shorter stitch length (more stitches per inch) provides a stronger seam than a longer stitch length. For reinforcing the header, a stitch length of 2-2.5 mm (approximately 8-10 stitches per inch) is recommended.
These hidden stitching techniques, while subtle, contribute significantly to the longevity and durability of the 暖簾 (noren), ensuring that it remains a functional and beautiful piece for years to come.
Header Material Selection: Influence on Overall Noren Weight
While the main body of the 暖簾 (noren) often dictates its overall weight, the choice of material for the header – particularly the rod pocket or tie reinforcement – also contributes significantly. Selecting a suitable material is crucial for maintaining the desired drape and preventing the 暖簾 (noren) from becoming top-heavy or unbalanced.
For lighter fabrics like thin 綿 (men/cotton fabric), using the same material for the header is often sufficient. However, for heavier fabrics or when extra reinforcement is needed, consider using a sturdier material for the header, such as a heavier weight 木綿 (momen/cotton), canvas, or even a thin, flexible leather. These materials provide added support and prevent the header from stretching or sagging under the weight of the 暖簾 (noren).
Another important factor to consider is the color and texture of the header material. Ideally, it should complement the main fabric and blend seamlessly with the overall design. Choosing a contrasting color can create an interesting visual detail, but it should be done deliberately and with careful consideration.
The weight of the header material also affects the way the 暖簾 (noren) hangs. A heavier header will cause the 暖簾 (noren) to drape differently than a lighter header. If the goal is a soft, flowing drape, a lighter header material is preferable. If a more structured or tailored look is desired, a heavier header material may be more appropriate.
Furthermore, consider the care requirements of the header material. It should be compatible with the care requirements of the main fabric to avoid any issues during washing or cleaning. If the main fabric is delicate and requires hand washing, the header material should also be hand washable.
Ultimately, the choice of header material is a balancing act between functionality, aesthetics, and practicality. By carefully considering these factors, you can create a 暖簾 (noren) that is not only beautiful but also durable and well-balanced.
Material Properties and Their Effect on Noren Drape and Size Perception
The choice of fabric dramatically influences how a 暖簾 (noren) drapes, filters light, and maintains its shape over time. Beyond mere aesthetics, material properties dictate the noren's functionality and its integration into the surrounding space. Understanding these nuances is crucial for selecting a noren that perfectly suits your needs and enhances the desired ambiance.
Cotton vs. Linen vs. Synthetic Fibers: Weight and Drape Differences
While seemingly similar at first glance, cotton (木綿, momen) and linen (麻, asa) noren exhibit distinct drape characteristics. Our noren materials guide covers each fabric in detail. Cotton, generally softer and more pliable than linen, offers a more fluid, gentle drape. It tends to cling slightly, creating softer folds. Think of a well-worn cotton tenugui 手拭い (hand towel); its natural inclination is to fall in graceful curves. Linen, on the other hand, possesses a crispness and inherent stiffness. This results in a more structured, angular drape, holding sharper creases and maintaining a more defined shape. Linen noren stand straighter, creating a bolder visual statement. The weight difference, though subtle, further contributes to this disparity. Linen fibers are typically thicker than cotton, resulting in a slightly heavier fabric per unit area. This increased weight enhances linen's ability to resist billowing in breezes, a factor to consider for noren placed in doorways exposed to drafts.
Synthetic fibers, such as polyester, introduce a completely different dynamic. While they offer superior durability and resistance to wrinkles and fading, their drape often lacks the natural appeal of cotton or linen. Polyester noren tend to have a stiffer, less organic hang, sometimes appearing somewhat artificial. However, advancements in textile technology have produced synthetic blends that mimic the look and feel of natural fibers, offering a compromise between aesthetics and practicality. The key is to carefully examine the fabric composition and weight to ensure the desired drape. Lightweight synthetics may billow excessively, while heavier blends can achieve a more controlled fall.
The yarn used also changes the drape significantly. For example, a finely woven, combed cotton will drape far differently than a coarsely spun cotton canvas.
Thickness of Fabric: Impact on Light Filtration and Privacy
The thickness of the fabric directly correlates to its light filtration and privacy levels. A thin, loosely woven cotton voile, for example, will allow a considerable amount of light to pass through, creating a bright and airy feel. Such a noren provides minimal privacy, serving primarily as a decorative element or a subtle visual partition. Conversely, a thick, tightly woven linen or a double-layered cotton noren will significantly reduce light transmission, offering a higher degree of privacy.
Consider the intended purpose of your noren. For a restaurant entrance wanting to subtly obscure the interior while still inviting customers, a medium-weight cotton or linen would be ideal. The slight transparency hints at the activity within, creating curiosity without compromising the ambiance. For a private residence, particularly in areas where privacy is paramount, a heavier fabric or multiple layers might be preferable. The thickness also affects how the noren behaves in different light. A thin noren might appear washed out in direct sunlight, whereas a thicker noren will maintain its color and vibrancy.
Japanese culture often balances light and shadow to create atmosphere. A thick noren can be used to purposefully darken a space, creating a sense of intimacy and refuge. This is often seen in traditional tea houses and private dining rooms. The interplay of light and shadow adds depth and complexity to the overall aesthetic.
Expert Insight: Consider the ambient light of the location where the noren will hang. Take a photo of the doorway/area during the brightest and dimmest times of day to help determine the desired level of light filtration.
Shrinkage Considerations: Pre-Washing and Allowance Factors
Natural fibers, particularly cotton and linen, are prone to shrinkage after washing. This is a critical factor to consider when determining the appropriate size of your noren. Failing to account for shrinkage can result in a noren that is significantly shorter than intended, impacting its overall appearance and functionality.
The extent of shrinkage varies depending on the type of fabric, its weave, and the washing method. As a general guideline, expect cotton to shrink between 3% and 5%, while linen can shrink even more, potentially up to 10%. Pre-washing the fabric before sewing the noren is the most effective way to mitigate shrinkage. This allows the fibers to relax and contract before the final dimensions are established. If pre-washing is not feasible, it is essential to add an allowance for shrinkage during the measurement and cutting process.
Calculate the shrinkage allowance by multiplying the desired length and width by the estimated shrinkage percentage. For example, if you want a finished noren that is 150cm long and you anticipate 5% shrinkage, you should add 7.5cm (150cm x 0.05) to the initial length. It's always better to err on the side of caution and add a slightly larger allowance, as it is easier to shorten a noren than to lengthen it.
Another important consideration is the potential for uneven shrinkage. Different parts of the fabric may shrink at different rates, leading to distortion or puckering. This is more likely to occur with loosely woven fabrics or fabrics that have been dyed or printed. To minimize uneven shrinkage, wash the fabric in cool water and avoid using harsh detergents or bleach. Tumble drying should also be avoided, as the high heat can exacerbate shrinkage and damage the fibers. Hang the fabric to dry in a shaded area to prevent fading.
Pattern Density and its Visual Effect on Perceived Noren Size
The density and scale of patterns printed or woven onto a noren significantly impact its perceived size and visual weight. A noren adorned with a large, bold pattern will appear more prominent and commanding than one with a subtle, delicate design. Conversely, a dense, intricate pattern can make a noren seem smaller and more contained.
Consider the overall aesthetic of the space where the noren will be placed. A large, vibrant pattern can be an excellent focal point in a minimalist setting, adding a touch of drama and personality. However, in a space that is already heavily decorated, a simpler pattern or a solid color may be more appropriate to avoid visual overload.
The scale of the pattern should also be proportionate to the size of the noren. A small pattern on a large noren can appear insignificant, while a large pattern on a small noren can feel overwhelming. Finding the right balance is key to creating a visually harmonious and balanced effect. Furthermore, the directionality of the pattern can influence the perceived height or width of the noren. Vertical stripes or patterns can visually elongate the noren, making it appear taller, while horizontal patterns can widen it. The placement of the pattern is equally important. A pattern that is concentrated in the center of the noren will draw the eye to that area, while a pattern that is distributed evenly across the entire surface will create a more uniform and balanced appearance.
Choosing the Right Noren Size for Different Purposes
Selecting the ideal noren size hinges on its intended purpose and the atmosphere you wish to cultivate. From the intimate setting of a home to the bustling environment of a commercial space, noren can serve practical and aesthetic functions. Careful consideration of dimensions is paramount to achieving the desired effect.
Residential Use: Entryways, Room Dividers, and Closets
Within a home, noren offer a versatile solution for defining spaces and adding a touch of Japanese aesthetic.
-
Entryways: For a genkan (玄関 – entryway), the width should closely match the doorway opening, usually around 85cm (33.5 inches) to 90cm (35.4 inches). The length, however, is where you have more flexibility. A shorter noren, perhaps 90cm (35.4 inches) to 120cm (47.2 inches) long, creates a casual, welcoming feel, allowing some visibility into the space beyond. A longer noren, extending to about 150cm (59 inches) or even floor-length (though less common in homes for entryways), imparts a sense of formality and privacy. Think of it as controlling the visual flow – guiding the eye and suggesting what's beyond. Don't forget to factor in the drop from the rod; a slightly shorter noren can appear dwarfed if hung too high. The goal is to present a balanced visual proportion in the entryway.
-
Room Dividers: Using noren as room dividers presents opportunities for creative spatial separation. Consider the scale of the room. In a smaller apartment, multiple narrow noren (perhaps 40cm to 50cm / 15.7 inches to 19.7 inches wide each) hung side-by-side can create a lighter, airier effect than one large, solid noren. For dividing larger living spaces, wider noren, such as those around 120cm (47.2 inches), are better suited. Length is again dependent on the desired level of privacy and visual connection. A half-length noren can subtly delineate areas while maintaining a sense of openness; a longer noren offers greater division, but be mindful of blocking light and potentially making the space feel smaller.
-
Closets: Noren provide an elegant alternative to traditional closet doors, especially in smaller spaces where swinging doors may be impractical. Here, width should correspond to the closet opening. Length is crucial; a noren that pools on the floor looks untidy, while one that's too short defeats the purpose. Aim for a length that allows the noren to hang just above the floor. If you're concealing storage items, consider a darker colored fabric or one with a denser weave to minimize visibility. A noren for closet use often prioritizes functionality over elaborate design, offering a clean and simple aesthetic.
Expert Insight: When using noren as a room divider, install a tsuppari-bou (突っ張り棒 – tension rod) rather than a fixed rod. This offers flexibility to easily move or remove the noren as needed, without causing damage to walls.
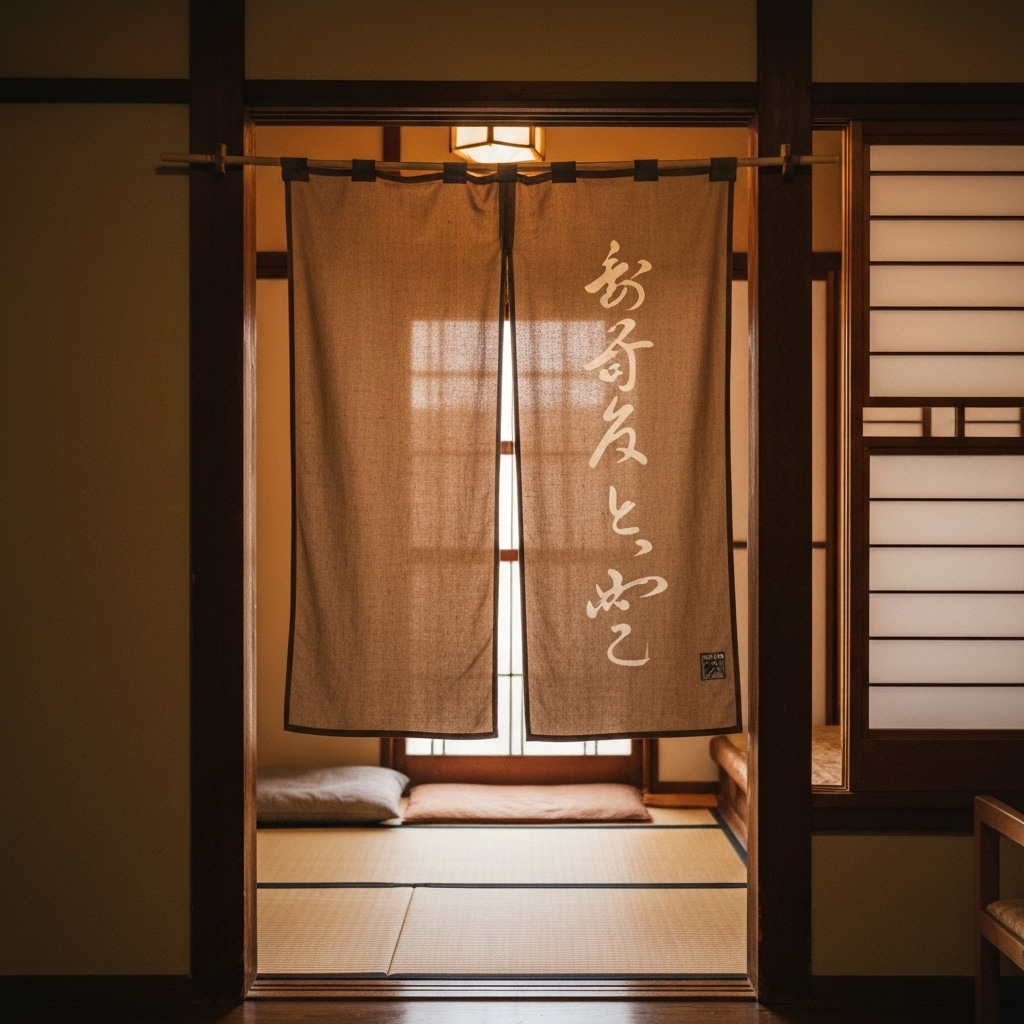
Commercial Use: Shop Entrances, Kitchen Dividers, and Restaurant Decor
In commercial settings, noren function as practical signage, visual cues, and decorative elements, all contributing to the customer experience.
-
Shop Entrances: Noren at shop entrances serve a dual purpose: attracting customers and subtly conveying the shop's identity. The width is typically dictated by the doorway, but the length is a deliberate choice. A longer noren, often reaching just above the ground, signifies a more established and traditional business. Shorter noren are more common at casual eateries or shops aiming for a contemporary feel. The slits (often referred to as kire or ware) are also important. Deeper slits allow for easier passage, especially when carrying items, while shallower slits maintain a greater sense of privacy and formality. Many shops will display their name or logo using kanji or katakana characters to promote brand identity.
-
Kitchen Dividers: In restaurants, noren effectively separate the kitchen from the dining area, subtly concealing activity while allowing staff to move freely. Functionality is key. The noren should be wide enough to adequately cover the opening, minimizing noise and visual distraction for diners. Length should be sufficient to prevent accidental snagging by staff carrying trays or equipment. Consider a slightly heavier fabric to help dampen sound. For kitchens with high heat or humidity, prioritize materials that are durable and easy to clean. Often, the noren will bear the restaurant's name or a simple design relevant to the cuisine.
-
Restaurant Decor: Beyond the kitchen, noren can enhance the overall ambiance of a restaurant. Smaller noren hung in hallways or alcoves can add visual interest and reinforce the restaurant's theme. Consider using noren with traditional patterns or designs to evoke a specific atmosphere, such as a vintage izakaya (居酒屋 – Japanese pub) or a refined kaiseki (懐石 – multi-course Japanese meal) restaurant. Size should complement the surrounding décor, avoiding overpowering the space. The design should harmonize with the overall aesthetic vision.
Seasonal Decorations: Festivals, Holidays, and Special Events
Noren transform spaces for seasonal celebrations, reflecting the spirit of the occasion.
-
Festivals: During matsuri (祭り – Japanese festivals), noren are ubiquitous, adorning stalls and shopfronts. Often featuring bold colors and festive motifs, they add vibrancy and excitement to the atmosphere. Size typically varies depending on the stall’s dimensions, but they tend to be shorter and wider than those used year-round. The design is often linked to the specific festival, featuring imagery of deities, local traditions, or popular foods.
-
Holidays: For holidays like New Year (正月 – shōgatsu) or Children's Day (子供の日 – kodomo no hi), noren are used to create a festive mood within homes and businesses. New Year noren often feature auspicious symbols like cranes or pine trees, while Children's Day noren may depict carp streamers (koi nobori 鯉のぼり). Size depends on the location where they are hung – smaller noren for interior doorways and larger ones for entrances.
-
Special Events: Noren can also commemorate special events such as anniversaries, grand openings, or themed parties. Custom-designed noren with personalized messages or logos add a unique touch. For temporary installations, consider using lightweight fabrics and simple hanging mechanisms. The size should be proportionate to the event space and the number of attendees.
Privacy Screening: Balancing Opacity and Light Transmission
Noren offer a delicate balance between privacy and light. The right choice depends on the desired level of seclusion and the amount of natural light you want to allow into the space.
-
Opacity: The density of the weave significantly affects opacity. Thicker fabrics, like heavy cotton or densely woven linen (麻 – asa), provide greater privacy, while sheer fabrics like voile allow more light to pass through. Consider the weave of the material in relationship to how much of a view you want to conceal.
-
Light Transmission: Darker colors naturally absorb more light, while lighter colors reflect it. If maximizing natural light is a priority, opt for light-colored noren made from semi-transparent fabrics. Conversely, if you need to block out light, choose darker colors and thicker fabrics. Layering two noren – a sheer one and a heavier one – offers flexibility in controlling light and privacy levels. Consider how the fabric color will cast light in the space.
-
Placement: The distance between the noren and the area you want to screen also impacts perceived privacy. A noren hung close to a window — as a noren window treatment — provides greater privacy than one hung further away. The angle of view is a factor as well; a noren placed perpendicular to a line of sight provides greater screening than one placed at an angle. Think about the location of light sources and how it impacts visibility.
Measuring Your Space Accurately: A Step-by-Step Noren Size Guide
Using a Measuring Tape Correctly: Ensuring Precise Measurements
Accuracy is paramount. While a quick estimate might seem sufficient, particularly with the forgiving nature of fabric, precise measurements (正確な測定, seikaku na sokutei) will guarantee a far more pleasing and functional result when hanging your noren (暖簾). Always use a rigid measuring tape, preferably one with both centimeter (センチメートル, senchi meetoru) and inch (インチ, inchi) markings for ease of conversion. Fabric vendors in Japan, while increasingly accommodating to international customers, often still list dimensions primarily in centimeters.
Begin by extending the measuring tape completely, ensuring it is not twisted or kinked. It's surprisingly easy to introduce inaccuracies this way. Anchor the "zero" end firmly at your starting point, whether it's the top of the doorway or the ceiling if you intend to suspend the noren from a higher point. Pull the tape taut but not stretched, across the space you wish to cover. Read the measurement at the precise endpoint. Don't round up or down unless absolutely necessary, and even then, only round to the nearest half-centimeter (approximately ¼ inch) at most.
For vertical measurements, gravity is your friend. Let the tape hang naturally to the desired length, rather than trying to hold it horizontally in mid-air. This will give you a more accurate reading of the eventual drape. When measuring the width of a doorway, take several measurements at different heights (top, middle, and bottom) to account for any potential irregularities. Record all measurements for later reference.
When measuring alone, consider using painter's tape to temporarily secure the end of the measuring tape, especially for longer distances. This frees up both hands to ensure the tape remains taut and the reading is accurate. Use a new, high-quality measuring tape. Older tapes can stretch or warp over time, leading to inaccurate readings. Expert Insight: Always double-check your measurements. It's better to be certain before placing an order or cutting fabric than to realize your noren is the wrong size after all the work is done.
Accounting for Doorway Frames and Obstacles
Doorway frames (ドア枠, doa waku) are rarely perfectly square or even. Before committing to a specific noren size, carefully examine the frame for any irregularities or imperfections. Measure the width at the very top, the middle, and the bottom of the frame opening. Note the narrowest measurement – this is the critical dimension for ensuring your noren hangs freely without bunching or snagging. If there is a significant difference in width (more than 1-2 cm or ½ inch), you may need to consider a custom-sized noren or adjust the mounting position of the rod.
Furthermore, consider the depth of the frame. A particularly deep frame might cause the noren to sit further back from the opening than intended, altering the overall aesthetic. You might need to compensate by ordering a slightly wider noren to achieve the desired coverage.
Obstacles such as light switches, door handles, or decorative moldings must also be factored into your measurements. A noren that obscures a light switch, for example, is not only inconvenient but potentially unsafe. Measure the distance from the edge of the doorway to the obstacle and ensure that the noren will clear it comfortably. You might choose a shorter noren or a design with a split specifically positioned to avoid the obstruction. Similarly, consider the swing of any doors. You don't want the noren constantly being caught on the door as it opens and closes.
The traditional placement of noren is often just inside the door frame, especially in businesses. If a shop’s noren is being regularly caught by the door, it can damage the fabric and the door. Proper consideration of the door’s swing prevents this.
Measuring for Multiple Noren Panels: Equal Distribution and Spacing
For wider openings, multiple noren panels (複数の暖簾, fukusū no noren) can create a visually stunning and practical solution. This approach is common in restaurants and traditional businesses, where a grand entrance is desired. Measuring for multiple panels requires careful consideration of equal distribution (均等な配置, kintō na haichi) and appropriate spacing.
First, determine the total width of the opening you wish to cover. Decide how many panels you want and how much overlap, if any, you desire between them. Some prefer a slight overlap for added privacy or to minimize drafts, while others prefer a clear separation between the panels.
Calculate the width of each individual panel using the following formula:
Panel Width = (Total Width + Total Overlap) / Number of Panels
Where:
- Total Width is the measured width of the opening.
- Total Overlap is the desired total overlap between all panels (if any). A typical overlap is 5-10cm (2-4 inches) per panel.
- Number of Panels is the number of panels you intend to use.
For example, if you have a 150cm (59-inch) opening and want to use three panels with a 5cm (2-inch) overlap between each panel (total overlap of 10cm or 4 inches), the calculation would be:
Panel Width = (150cm + 10cm) / 3 = 53.33cm (approximately 21 inches)
In this case, you would need three panels, each approximately 53.33cm (21 inches) wide.
Consider also the vertical spacing between the top of the doorway and the saotooshi (竿通し) or rod pocket. If your rod sits lower than the top of the door, then the panel lengths must be adjusted accordingly to still achieve the desired effect. In these situations, you may need to do some trial and error with temporary placement, measuring carefully at each step.
Spacing can be adjusted in other ways, too. A series of five or seven narrow noren hanging very close together can produce a unique visual effect compared to the same area covered by two or three wider noren.
Photographing Your Space for Visual Reference
Before finalizing your noren order, taking a photograph (写真撮影, shashin satsuei) of the intended space can be incredibly helpful. A photograph provides a visual reference that allows you to assess the overall aesthetic impact of the noren before it's even hung.
Take the photograph from a straight-on perspective, ensuring that the entire doorway or opening is visible in the frame. Good lighting is essential; avoid backlighting or harsh shadows that can distort the appearance of the space. Use a tape measure to show relative scale in the photo by temporarily affixing it where the noren will hang.
Once you have the photograph, you can use photo editing software or even a simple drawing app to simulate the appearance of different noren sizes, colors, and designs. This allows you to experiment with various options and visualize the final result. You can also share the photograph with the vendor or artisan creating your noren to ensure they have a clear understanding of the intended application.
A photo also allows you to see the larger context of the noren. Does the noren clash with the overall décor, or does it complement and enhance it? This is especially important if the noren includes a family mon (紋) or shop logo. Be certain that it looks visually appropriate in the intended location. A photograph will allow you to evaluate these important considerations before committing to a purchase.
Custom Noren Sizing and Alterations: Tailoring to Your Specific Needs
While standard-sized 暖簾 (noren) offer convenience, achieving a truly personalized aesthetic often necessitates custom sizing or alterations. Whether you require a unique length for an oddly shaped doorway or wish to incorporate embellishments that demand specific dimensions, tailoring your noren opens up a world of design possibilities. This section explores the nuances of custom noren, providing guidance for collaborating with professionals and executing DIY modifications.
Working with a Seamstress or Tailor: Communicating Your Vision
Effective communication is paramount when entrusting a seamstress or tailor with your custom noren project. Begin by compiling visual references – photographs, sketches, or even existing noren that exemplify your desired outcome. Clearly articulate your spatial requirements using precise measurements, preferably in both centimeters (cm) and inches.
Provide detailed specifications regarding the 竿通し (saotooshi, rod pocket). Indicate its desired width, depth, and placement. If you envision a reinforced header, specify the type of interfacing or additional fabric you prefer. For split noren, state the exact placement and length of the slits (割れ, ware). Don't assume the professional will automatically replicate a standard configuration; meticulous details are crucial.
Describe the intended usage and environment. A noren for a bustling restaurant entrance will require more robust construction than one intended for a quiet room divider. If exposed to direct sunlight or moisture, discuss appropriate material treatments or protective linings. Share any specific preferences regarding thread type, stitch density, and finishing techniques.
Crucially, discuss potential shrinkage, particularly with natural fibers like 綿 (men, cotton) or 麻 (asa, hemp/linen). Factor this into your initial measurements and request pre-washing or steaming to minimize post-alteration shrinkage.
A written agreement outlining all specifications, including dimensions, materials, construction details, and estimated completion date, will help prevent misunderstandings and ensure a satisfactory outcome.
Expert Insight: Before commissioning a full custom noren, request a small sample sewn according to your specifications. This allows you to assess the workmanship, verify the fit, and make necessary adjustments before committing to the entire project.
DIY Alteration Techniques: Shortening, Widening, and Hemming
For minor adjustments, DIY alterations can be a cost-effective solution. Shortening a noren is relatively straightforward. Begin by carefully measuring and marking the desired finished length, adding an allowance for the hem. Use a rotary cutter or sharp scissors to trim the excess fabric, ensuring a clean, straight line. Fold the hem allowance twice to create a neat edge, then pin in place. Sew the hem using a straight stitch or a blind hem stitch for a more invisible finish. Reinforce the corners for added durability.
Widening a noren is more complex and requires adding fabric panels to the sides. Select a fabric that closely matches the original in terms of color, weight, and texture. Cut the panels to the desired width, adding seam allowances. Pin the panels to the sides of the noren, right sides together, and sew along the seam lines. Press the seams open and finish the raw edges with a serger or zigzag stitch to prevent fraying.
Hemming raw edges is essential to prevent unraveling and create a polished look. For lightweight fabrics, a simple folded hem is sufficient. For heavier fabrics, consider a bias tape hem or a decorative edging.
When altering a noren with a printed design, take extra care to avoid disrupting the pattern. Consider mirroring the design on the added panels to maintain visual symmetry. If the design is complex, consult a professional to ensure a seamless integration.
Adding Weights or Linings: Improving Drape and Stability
Adding weights or linings can significantly enhance the drape and stability of a noren. Weights are particularly useful for noren placed in drafty areas or used as exterior shop entrances. Small weights, such as metal washers or decorative beads, can be sewn into the bottom hem at regular intervals. Alternatively, specialized drapery weights are available in various shapes and sizes.
A lining adds body and opacity, improves insulation, and protects the noren from fading. Choose a lining fabric that is compatible with the main fabric in terms of weight, texture, and care requirements. Lightweight cotton or polyester linings are suitable for most noren. For added insulation, consider a thermal lining.
To attach a lining, begin by cutting the lining fabric to the same size as the noren. Pin the lining to the noren, wrong sides together, and baste around the perimeter. Sew the lining to the noren along the top edge, incorporating it into the rod pocket. Hem the bottom edge of the lining separately, ensuring it is slightly shorter than the main fabric to prevent it from peeking out.
Embellishments: Adjusting size to Accommodate Tassels, Beads, or Appliqués
Embellishments such as tassels, beads, or appliqués can personalize a noren and add visual interest. However, these additions often require adjusting the size or construction of the noren to accommodate their presence.
Tassels are typically attached to the bottom edge of a noren. When determining the length of the noren, factor in the length of the tassels to ensure the desired overall drop. Consider the weight of the tassels; heavier tassels may require reinforcing the bottom hem.
Beads can be strung along the bottom edge or incorporated into the design of the noren. When using beads, select a durable thread and secure the beads tightly to prevent them from falling off. Ensure that the beadwork does not interfere with the noren's movement or create a safety hazard.
Appliqués involve attaching fabric shapes to the surface of the noren. When planning an appliqué design, consider the size and placement of the appliqués. Ensure that the appliqués are securely attached using fusible interfacing or hand-sewing. Choose fabrics that are compatible with the main fabric in terms of color, weight, and care requirements. Leave ample space around the edges of appliqués to prevent the raw edges from fraying.
Consider the impact of embellishments on the overall weight and drape of the noren. Heavy embellishments may require adding weights or linings to maintain stability and prevent sagging. Experiment with different placements and combinations of embellishments to achieve the desired aesthetic.
Noren Care and Maintenance: Preserving Size and Shape Over Time
Owning a 暖簾 (noren) is akin to possessing a small piece of Japanese culture. To ensure its longevity and maintain its intended size and drape, careful handling and maintenance are essential. Over time, even the most robust 暖簾 can succumb to wear and tear if not properly cared for. These simple yet effective techniques will aid in preserving your 暖簾 for years to come.
Washing Instructions: Machine Washing vs. Hand Washing
The primary consideration when washing your 暖簾 is the type of fabric and dyes used. Most commercially available 暖簾 are either 綿 (men, cotton fabric) or 麻 (asa, hemp/linen) blends. Hand washing is generally recommended, especially for antique or 藍染め (aizome, indigo-dyed) pieces, as well as those employing 型染め (katazome) techniques, where intricate stencil patterns are used.
For hand washing, use a basin or tub filled with lukewarm water and a mild, pH-neutral detergent. Submerge the 暖簾 and gently agitate it, avoiding harsh scrubbing or wringing. Pay particular attention to soiled areas, using a soft brush if necessary. Rinse thoroughly with cool water until all traces of soap are gone.
Machine washing, if deemed acceptable based on the fabric and dye stability, should be done on a delicate cycle with cold water and a similar mild detergent. Place the 暖簾 inside a mesh laundry bag to minimize friction and prevent snagging. Avoid overcrowding the washing machine, as this can lead to uneven cleaning and distortion. Never use bleach, as it can damage the fibers and cause fading, particularly in traditionally dyed pieces. Furthermore, avoid using fabric softener, which can leave a residue that alters the drape.
Key Considerations for Washing:
- Always test a small, inconspicuous area of the 暖簾 for colorfastness before washing the entire piece.
- For antique 暖簾, consider consulting a textile conservator for professional cleaning advice.
- If your 暖簾 features embellishments such as embroidery or appliqué, hand washing is the safest option.
Drying Techniques: Preventing Shrinkage and Distortion
The drying method significantly impacts the final size and shape of your 暖簾. Avoid using a tumble dryer, as the high heat can cause significant shrinkage and distortion of the fibers, especially natural fibers like cotton or linen.
The ideal drying method is to air dry the 暖簾 flat on a clean, dry surface or hang it on a padded hanger away from direct sunlight. If hanging, ensure the 竿通し (saotooshi, rod pocket) is properly aligned to prevent stretching. Gently reshape the 暖簾 while it is still damp to help it retain its original dimensions. Avoid using clothespins directly on the fabric, as they can leave unsightly marks. Instead, use padded clips or hang the 暖簾 over a clothesline.
For 藍染め (aizome) 暖簾, drying in the shade is crucial to prevent fading. Indigo dye is particularly sensitive to sunlight, and prolonged exposure can cause the color to lighten over time.
Specific Recommendations:
- For larger 暖簾, consider using a drying rack with multiple tiers to distribute the weight evenly.
- Ensure the drying area is well-ventilated to promote faster drying and prevent mildew growth.
- If you live in a humid climate, consider using a dehumidifier to speed up the drying process.
Ironing and Steaming: Removing Wrinkles and Maintaining Drape
Ironing or steaming can effectively remove wrinkles and restore the crisp drape of your 暖簾. However, it's essential to use the appropriate heat setting and technique for the specific fabric.
For cotton or linen 暖簾, use a medium heat setting and iron on a slightly damp surface. Use a pressing cloth between the iron and the fabric to protect the fibers and prevent scorching, especially for darker colors. For delicate fabrics like silk (絹, kinu), use a low heat setting and a pressing cloth.
Steaming is a gentler alternative to ironing and is particularly well-suited for delicate fabrics or 暖簾 with intricate details. Use a garment steamer and hold it a few inches away from the fabric, moving it slowly and evenly. Avoid over-steaming, as this can cause the fabric to become overly saturated and potentially distort its shape.
Expert Insight: For 藍染め (aizome, indigo-dyed) 暖簾, iron on the reverse side to help preserve the vibrancy of the color.
Ironing and Steaming Tips:
- Always test the heat setting on a small, inconspicuous area of the 暖簾 before ironing the entire piece.
- For 暖簾 with embroidery or appliqué, iron on the reverse side and use a pressing cloth to protect the embellishments.
- If you are unsure about the fabric content, err on the side of caution and use a low heat setting or steaming.
Storage Solutions: Folding and Protecting Noren from Damage
Proper storage is crucial for protecting your 暖簾 from damage and maintaining its size and shape when not in use. Avoid storing 暖簾 in damp or humid environments, as this can lead to mildew growth and fabric deterioration.
The best way to store a 暖簾 is to fold it neatly along its natural creases and place it in a breathable cotton bag or acid-free paper. Avoid using plastic bags, as they can trap moisture and promote mildew growth. Store the bag in a cool, dry place away from direct sunlight and extreme temperatures.
If you have multiple 暖簾, consider storing them separately to prevent dye transfer or damage from friction. For larger 暖簾, you can roll them instead of folding to minimize creasing.
Before storing your 暖簾, ensure it is clean and completely dry. This will help prevent mildew growth and insect infestation. Consider adding a sachet of lavender or cedar chips to the storage bag to repel moths and other pests.
Storage Best Practices:
- Regularly inspect your stored 暖簾 for signs of damage or deterioration.
- Avoid stacking heavy items on top of stored 暖簾, as this can cause creases and distortions.
- Consider rotating your 暖簾 periodically to prevent fading or discoloration in specific areas.
- If your 暖簾 has a 竿通し (saotooshi, rod pocket), store it flat or rolled to avoid stretching the pocket.