How to Hang a Noren Curtain: A Simple Step-by-Step Guide
Understanding Noren Construction and Materials
Ah, the noren (暖簾) – more than just a curtain, it's a whisper of Japanese culture adorning doorways, shops, and even homes. To truly appreciate what you're hanging, it helps to understand what a noren is and its history. Before you even think about hanging one, let's delve into the fascinating world of their construction. Understanding the materials and styles will empower you to choose and hang your noren with the knowledge and respect it deserves. After all, it's not just decoration; it's a small piece of Japan.
Traditional Noren Fabrics: Hemp, Cotton, and Linen
For centuries, Japanese artisans have favored natural fibers for noren, prizing their durability, breathability, and ability to accept dyes beautifully. The classic trio consists of hemp (麻 asa), cotton (綿 men), and linen (亜麻 ama).
-
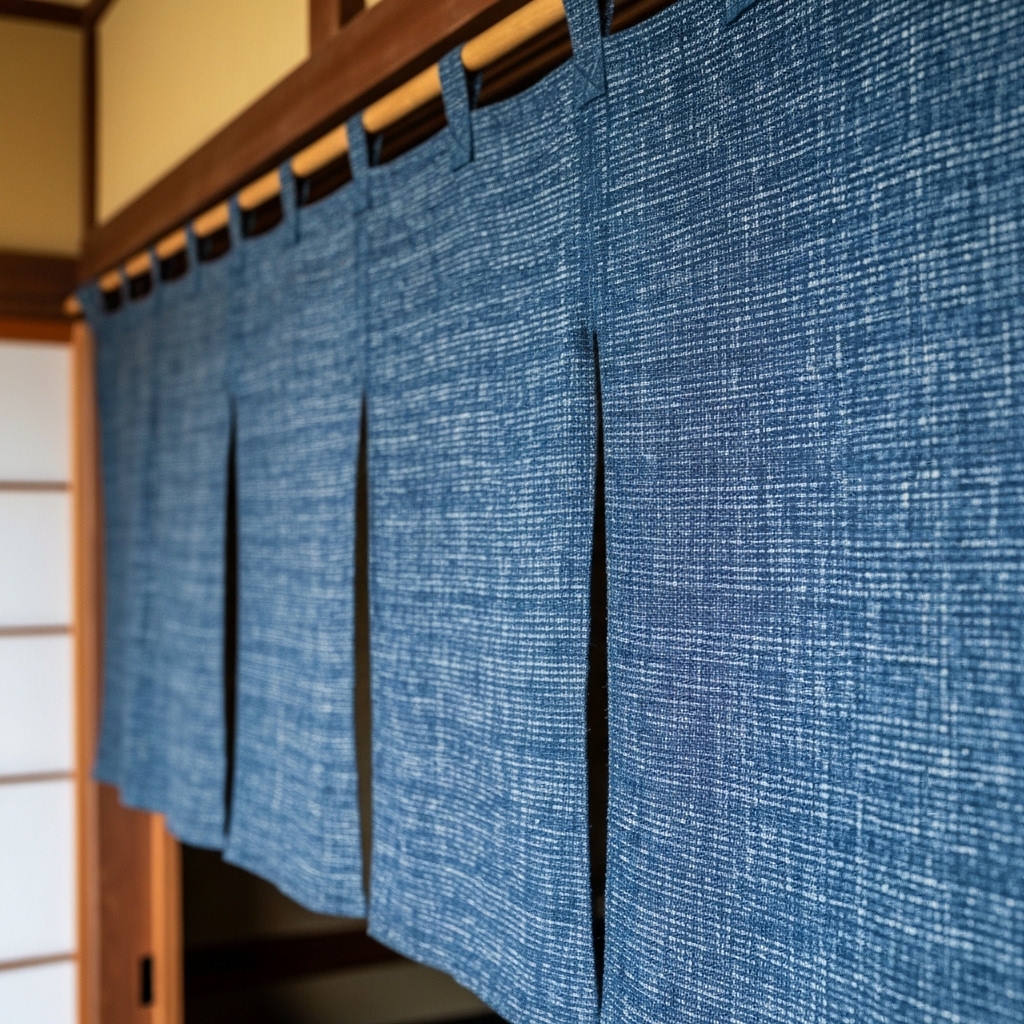
Hemp (麻 asa): Often considered the most traditional choice, hemp noren boast incredible strength and a subtly textured surface. Think of it as the "grand old man" of noren fabrics. You’ll often find heavier, more rustic noren, perhaps gracing the entrance to a traditional soba noodle shop (蕎麦屋 sobaya) or an old-fashioned confectionery (菓子屋 kashiya), crafted from hemp. Hemp breathes exceptionally well, allowing air to circulate while providing a degree of privacy. It's a more expensive option than cotton, but its longevity makes it a worthwhile investment. Hemp fibers range in thickness, creating variations in the final noren’s texture. Dyes take to hemp beautifully, resulting in rich, enduring colors. The raw hemp is relatively stiff. Over time, it softens slightly with washing and use, gaining a beautiful patina.
-
Cotton (綿 men): Cotton noren strike a balance between affordability, versatility, and comfort. They are readily available in various weights and weaves, making them suitable for a wide range of applications. A lighter cotton is often used for summer noren, offering a breezy feel, while a heavier cotton provides better insulation and privacy in colder months. You’ll see cotton noren everywhere, from the cheerful entrance of a neighborhood ramen shop (ラーメン屋 rāmen-ya) to the simple dividing curtain in a home. Cotton readily accepts dye, allowing for intricate designs and vibrant colors. It's also relatively easy to care for, typically machine washable on a gentle cycle. Look for yarn-dyed cotton noren for colors that are more resistant to fading.
-
Linen (亜麻 ama): Linen shares many desirable qualities with hemp, including strength and breathability, but often with a slightly smoother texture. Linen noren offer a refined aesthetic, often seen in upscale restaurants or shops specializing in artisanal goods. It drapes beautifully, lending an elegant touch to any space. Linen wrinkles more easily than hemp or cotton, adding to its natural charm. Like hemp, linen becomes softer and more supple with repeated washings. The subtle sheen of linen adds a touch of sophistication, making it a popular choice for those seeking a refined aesthetic. A natural linen noren with simple indigo dyeing (藍染 aizome) can be particularly stunning.
Here's a quick comparison:
| Feature | Hemp (麻 asa) | Cotton (綿 men) | Linen (亜麻 ama) |
|---|---|---|---|
| Durability | Excellent | Good | Excellent |
| Breathability | Excellent | Good | Excellent |
| Texture | Textured, Rustic | Varies, Soft to Coarse | Smooth, Refined |
| Cost | Higher | Moderate | Moderate to Higher |
| Dyeing | Excellent | Excellent | Excellent |
| Wrinkle | Minimal | Moderate | High |
| Common Use | Traditional Shops, High-End Applications | Homes, Shops, Restaurants | Upscale Restaurants, Boutique Shops |
Modern Noren Materials: Synthetics and Blends
While tradition runs deep, modern noren also embrace synthetic fabrics and blends, often prioritizing practicality, affordability, and specific functional properties.
-
Polyester (ポリエステル poriesuteru): Polyester noren offer exceptional durability, resistance to fading, and ease of care. They are often water-resistant, making them suitable for outdoor use or in humid environments. You might find polyester noren advertising a yakitori restaurant (焼鳥屋 yakitori-ya) near a train station, standing up to the elements. Polyester doesn't breathe as well as natural fibers and can feel less comfortable against the skin. However, advancements in textile technology have resulted in softer, more breathable polyester fabrics. These are less likely to shrink or wrinkle, making them a practical choice for busy households.
-
Acrylic (アクリル akuriru): Acrylic noren offer similar benefits to polyester, including durability and resistance to fading. They are often used for printed noren, where vibrant colors and intricate designs are desired. Acrylics are also often less expensive than polyester, making them a budget-friendly option. However, acrylics tend to pill more easily than polyester.
-
Blends: Blended fabrics combine the best properties of natural and synthetic fibers. A cotton-polyester blend, for example, offers the comfort of cotton with the durability and wrinkle resistance of polyester. These blends are increasingly common, offering a balanced approach to noren design. A linen-rayon blend may offer the drape of linen with enhanced wrinkle resistance. The specific properties of a blend depend on the ratio of fibers used.
Expert Insight: Before purchasing a noren, especially if it's a blend, check the care label. Washing instructions can vary significantly depending on the fabric composition.
Noren Styles: Single-Panel vs. Split-Panel Designs
Noren aren’t simply curtains; they’re thoughtfully designed pieces, often distinguished by their panel configuration. The two primary styles are single-panel and split-panel, each offering unique aesthetic and functional properties.
-
Single-Panel Noren: These noren consist of a single, undivided piece of fabric. They offer a clean, minimalist aesthetic and are often used to conceal storage areas or create a simple visual barrier. Single-panel noren are less common than split-panel designs but are sometimes seen in more modern interiors or as decorative wall hangings. They don’t offer the same ease of passage as split-panel noren. The overall width rarely exceeds 90 cm (35 inches), as this becomes unwieldy.
-
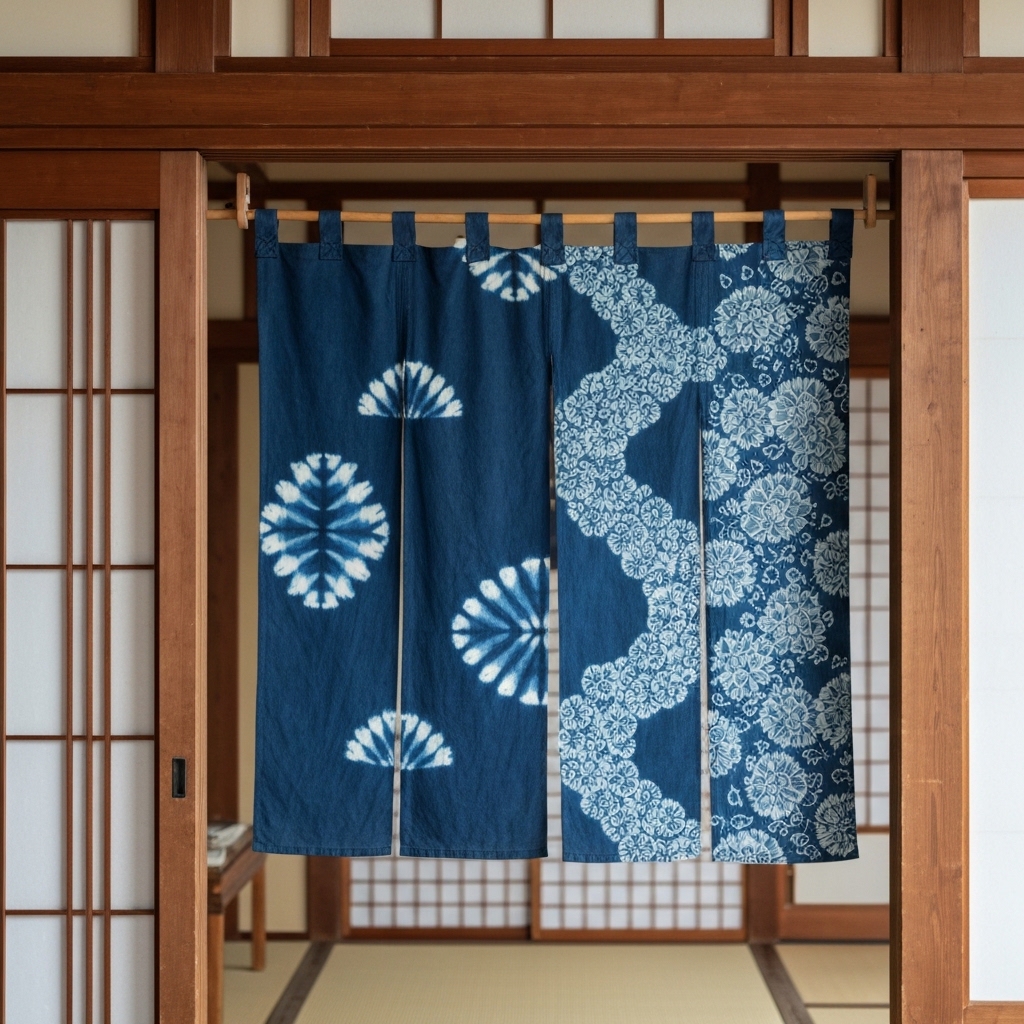
Split-Panel Noren: The hallmark of the classic noren, split-panel designs feature a vertical slit, or multiple slits, running from the bottom hem upwards. This allows for easy passage while still maintaining a degree of privacy and signifying that a business is open. The depth and number of splits can vary significantly, influencing the overall look and feel of the noren. Typically, the split extends about two-thirds of the way up the noren's height, allowing the fabric to billow gently and create a welcoming impression.
-
One Split (一重, hitoe): Less common, providing minimal passage.
-
Two Splits (二重, futae): The most prevalent configuration, offering a balance of coverage and accessibility. Think of the classic entrance to a restaurant, inviting you inside with the subtle sway of the fabric.
-
Multiple Splits (多重, tajuu): Used for wider doorways or to create a more decorative effect. These are less common, usually made on commission.
-
The split isn’t just aesthetic; it's deeply rooted in functionality. A noren with splits indicates "open for business." The act of pushing through the fabric is a subtle invitation and a way of announcing your presence.
Header Design Considerations: Sewn-in Loops and Rod Pockets
The header of a noren, the uppermost section that attaches to the hanging rod, is a crucial element often overlooked. Its design dictates how the noren hangs and contributes to its overall aesthetic. The two most common header designs are sewn-in loops and rod pockets.
-
Sewn-in Loops (紐通し himotooshi): These are small loops of fabric, typically made from the same material as the noren or a reinforcing material like twill tape, sewn along the top edge. A rod is then threaded through these loops to suspend the noren.
-
Advantages: Sewn-in loops allow for even distribution of weight, preventing sagging. They also offer flexibility in terms of rod size. You can use a thicker or thinner rod depending on the desired aesthetic and weight of the noren. Loops can also be easily reinforced for heavier noren.
-
Disadvantages: Loops can be more time-consuming to install than rod pockets. Also, the loops are visible, so they need to be aesthetically pleasing and match the overall design of the noren. The number of loops is important; too few, and the noren will sag; too many, and it can look cluttered. Typically, loops are spaced 10-15 cm (4-6 inches) apart.
-
-
Rod Pockets (筒縫い tsutsunui): A rod pocket is a channel sewn along the top edge of the noren, creating a "pocket" through which a rod can be inserted. This is a simple and elegant solution.
-
Advantages: Rod pockets are easy to install and offer a clean, seamless look. The rod is concealed within the pocket, creating a visually appealing suspension.
-
Disadvantages: The size of the rod pocket limits the diameter of the rod that can be used. Also, heavier noren may cause the rod pocket to stretch or sag over time. Reinforcement of the pocket seam is crucial for longevity. The standard size for a rod pocket is between 2.5 cm to 5 cm (1 to 2 inches) in diameter. Ensure your rod fits comfortably within the pocket, allowing for easy sliding and adjustments. For thicker rods, you will need a larger pocket.
-
The header choice depends on your aesthetic preferences, the weight of the noren, and the type of rod you intend to use. Consider the overall design and choose a header that complements the fabric and style of your noren. A simple cotton noren might look best with a rod pocket, while a heavier hemp noren might benefit from the added support of sewn-in loops.
Choosing the Right Noren Size and Style for Your Space
The perfect noren (暖簾) isn't just about aesthetics; it's about creating a harmonious flow and reflecting the purpose of the space it adorns. Selecting the right size and style requires careful consideration of your doorway, desired effect, and the overall ambiance you want to cultivate. Think of your noren as a functional piece of art, subtly guiding movement and adding a touch of Japanese elegance to your home or business.
Measuring Your Doorway or Opening Accurately
Precision is paramount when determining the ideal noren dimensions. For a comprehensive breakdown of standard and custom measurements, check out our noren size guide. While a slight variation won't ruin the effect, accurate measurements ensure a visually balanced and functional result. Avoid relying on pre-existing doorway measurements, as they can be inaccurate due to variations in construction. Instead, take your own measurements using a reliable measuring tape.
First, measure the width of the doorway or opening you intend to cover. This is the horizontal distance between the two inside edges of the frame. For a standard doorway, this is typically between 70 cm (27.5 inches) and 90 cm (35.5 inches). However, openings can vary widely, especially in older homes or uniquely designed spaces. Make sure to measure at the top, middle, and bottom of the opening, noting any discrepancies. Use the widest measurement for your calculations.
Next, measure the height of the opening from the top of the frame to the floor. This will help you determine whether you want a full-length or half-length noren, discussed in the next section. It’s crucial to consider the presence of any door jambs or obstructions that might affect the noren's hanging position.
Expert Insight: When measuring doorways with protruding door frames, measure from the inside edge of the frame to ensure the noren hangs freely and doesn't snag.
For unusual openings, such as arches or irregularly shaped entrances, take multiple measurements at various points. Sketching the opening and noting the measurements on the drawing can be helpful in visualizing the final product. Remember to account for the noren's heading (the top portion with the rod pocket), which will add a few centimeters to the overall height. Japanese noren are typically hung about 2-3 cm (1 inch) below the top of the door frame for easy access.
Determining the Ideal Length: Full-Length vs. Half-Length Noren
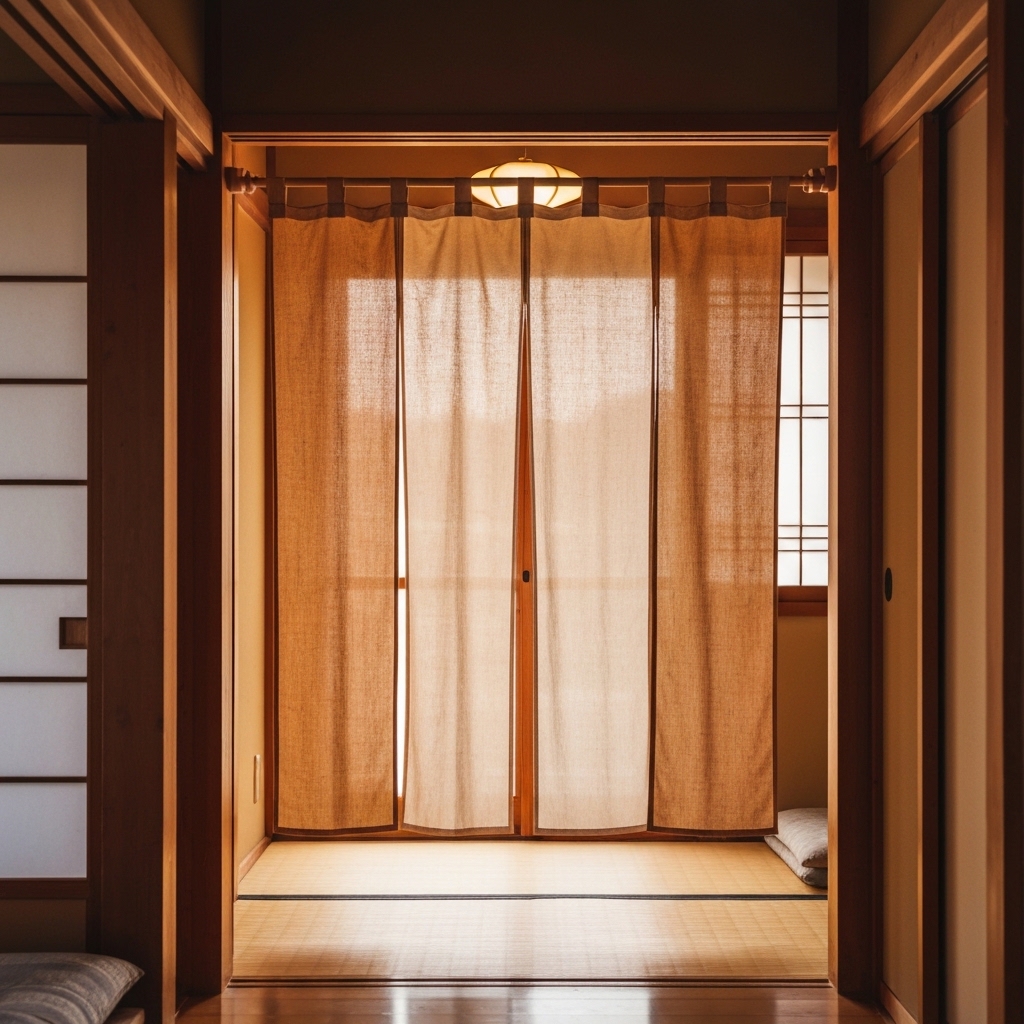
The length of your noren significantly impacts its functionality and aesthetic appeal. The choice between a full-length (長暖簾 naga-noren) and half-length (半暖簾 han-noren) depends on the purpose of the noren and the desired level of privacy or openness.
Full-length noren typically extend from just below the door frame to the floor or slightly above it. They offer maximum privacy and can effectively conceal a room or separate spaces. Full-length noren are often used in restaurants to delineate kitchen areas from the dining room or in traditional shops to create a sense of enclosure. In private homes, they can be used to divide living areas or create a sense of privacy in bedrooms or bathrooms.
A full-length noren will visually increase the height of your room. They can make a room look more majestic and dramatic. However, full length noren may be less practical where constant foot traffic is high. People would need to lift them as they pass through, which can lead to faster wear.
Half-length noren, on the other hand, typically hang to about waist height or slightly lower. They offer a more open and inviting feel, allowing for easy passage and visual connection between spaces. Half-length noren are commonly used in kitchens to signal that the area is closed or to partially conceal a messy work area. They are also popular in shops to subtly guide customers while maintaining an open and welcoming atmosphere. Many izakaya (Japanese pubs) use shorter noren to give customers a peek inside.
When choosing the length, consider the function of the room. For example, in a kitchen, a half-length noren might be ideal for concealing clutter while allowing you to easily monitor the cooking area. A full-length noren in a bedroom could provide added privacy and create a more intimate atmosphere. Consider the height of people who will be using the noren the most. If children are present, a shorter length might be more practical. Finally, the choice is also based on personal preferences. Consider the overall visual effect you want to achieve. Do you want to create a sense of mystery and enclosure, or a more open and inviting space?
Selecting a Design that Complements Your Décor
A noren's design should seamlessly integrate with your existing décor, enhancing the overall aesthetic of the space. Consider the color palette, patterns, and textures already present in the room. Look for a noren that complements these elements without clashing or overwhelming the existing style.
Japanese aesthetics often emphasize simplicity and harmony. Therefore, a noren with a minimalist design, subtle patterns, or muted colors can be a safe and effective choice for most spaces. Natural motifs, such as bamboo leaves, cherry blossoms (桜 sakura), or flowing water, are timeless and versatile options that can add a touch of nature and tranquility to your home.
However, don't be afraid to experiment with bolder designs if your décor allows. A vibrant noren with geometric patterns or abstract designs can add a pop of color and personality to a neutral space. Just be mindful of the overall balance and ensure that the noren doesn't compete with other focal points in the room.
Consider the material of the noren as well. A linen noren might have a rustic look perfect for a country-style kitchen. Silk noren work well with a formal living room.
Expert Insight: Take photos of your room in natural light and compare them with images of noren online. This will help you visualize how the noren will look in your space and identify potential clashes or harmonies.
In a traditional Japanese home, a noren might feature calligraphy (書道 shodō) or traditional motifs like cranes (鶴 tsuru) or Mount Fuji (富士山 Fuji-san). These elements add cultural significance and can enhance the authenticity of the space. In a more modern setting, a noren with a simple geometric design or a solid color might be more appropriate.
When selecting a design, consider the season. Some people change their noren seasonally, opting for lighter colors and floral patterns in the spring and summer and warmer colors and autumnal motifs in the fall and winter.
Matching Noren Style to Room Functionality (e.g., kitchen vs. entryway)
The functionality of a room should play a significant role in determining the appropriate noren style. The noren should not only complement the décor but also serve a practical purpose within the space.
In a kitchen, a noren door curtain can serve several functions. It can conceal a messy workspace, provide privacy from the dining area, or signal that the kitchen is closed for the night. A half-length noren is often ideal for kitchens, allowing for easy passage and ventilation while still providing some visual separation. The design might feature kitchen-related motifs, such as vegetables, cooking utensils, or Japanese characters related to food and drink.
In an entryway (玄関 genkan), a noren can create a welcoming atmosphere and subtly guide guests into the home. A full-length noren can provide a sense of privacy and create a transition between the outside world and the inner sanctuary of the home. The design might feature auspicious symbols, such as a beckoning cat (招き猫 maneki-neko) or a Daruma doll (達磨 daruma), to welcome good fortune.
In a bathroom (風呂 furo), a noren can provide privacy and create a spa-like atmosphere. A waterproof material might be preferable for bathrooms with high humidity. The design might feature calming motifs, such as water ripples, bamboo groves, or Japanese characters related to relaxation and purification.
For commercial spaces, the noren can convey important information about the business. For example, a restaurant might use a noren with its name and logo to attract customers. A shop might use a noren to indicate its opening hours or the types of products it sells. The design should be clear, concise, and easily visible from a distance. If a restaurant has a kitchen, they may use a noren with “preparation” in kanji to signify employees are preparing food for customers.
Essential Hardware and Tools for Hanging Your Noren
Now that you've selected the perfect noren (暖簾) for your space, let's talk about the hardware you'll need to actually get it hung. While noren themselves possess a certain understated elegance, choosing the right hanging method is equally crucial for achieving the desired aesthetic and ensuring the curtain hangs properly. In Japan, practicality and visual harmony go hand in hand.
Noren Rods: Telescoping, Fixed-Length, and Decorative Options
The noren-棒 (noren-bō, 暖簾棒) or noren rod is the primary support for your curtain. It’s inserted through the sewn-in loops at the top of the noren (through the saotooshi, 竿通し, the rod pocket/sleeve) and then rests on mounting brackets. You'll find three main types: telescoping, fixed-length, and decorative.
-
Telescoping Rods: These rods offer the most flexibility, especially if you're unsure of the exact width of your doorway or opening. They consist of two or more sections that slide into each other, allowing you to adjust the length within a specified range. A typical telescoping rod might extend from 70 cm to 120 cm (approximately 27.5 inches to 47 inches). These are generally constructed of metal (often aluminum or steel) or sometimes bamboo. Many will come with a rubberized tip on each end to provide friction against the mounting surface. Pay close attention to the rod's weight capacity, especially if you're hanging a heavier noren. While highly practical, telescoping rods tend to be less visually appealing than fixed-length or decorative options. Their strength lies in adaptability.
-
Fixed-Length Rods: For a clean, minimalist look, a fixed-length noren-bō is ideal. These are typically made of wood, bamboo, or metal and come in predetermined lengths. Measure your doorway carefully before purchasing to ensure a proper fit. The rod should extend slightly beyond the width of the noren itself on each side – usually about 2-5 cm (1-2 inches) – to prevent the curtain from bunching up and maintain a balanced appearance. Bamboo rods are popular in traditional settings, evoking a sense of rustic charm, while sleek metal rods complement modern interiors. The diameter of the rod also matters; a thicker rod will provide more stability and a more substantial look.
-
Decorative Rods: These rods prioritize aesthetics, often featuring ornate finials, carved details, or unique materials like wrought iron or intricately patterned wood. They serve as an integral part of the overall decor, enhancing the noren's visual impact. For example, you might find a dark lacquered wooden rod with gilded accents for a more formal setting, or a weathered driftwood rod for a coastal-inspired design. Decorative rods often come in fixed lengths, so precise measurement is essential. They can be more expensive than standard rods, but the added visual appeal can be well worth the investment. Some decorative rods also function as telescoping rods, so you get the best of both worlds. Keep the weight of the noren in mind, as decorative rods might be made of lighter materials and have a lower weight capacity.
Mounting Brackets and Hooks: Types, Materials, and Weight Capacity
The method you choose to support the noren-bō also matters. The most prevalent methods are brackets and hooks, and the materials they're made from should complement the noren and the rod itself.
-
Brackets: Brackets provide a stable and secure support for the noren rod. They typically consist of two pieces – one that attaches to the wall or doorframe and another that cradles the rod. Brackets come in a variety of materials, including metal (iron, brass, stainless steel), wood, and even ceramic. The choice depends on the style of your noren and the overall aesthetic of your space. For example, wrought iron brackets would complement a rustic or farmhouse-style noren, while sleek stainless steel brackets would be more appropriate for a modern minimalist design. Consider the projection of the bracket – how far it extends from the wall. A bracket with a longer projection will allow the noren to hang further away from the doorframe, which can be desirable if the doorway is recessed.
-
Hooks: Hooks offer a simpler and often more affordable alternative to brackets. They are typically made of metal or plastic and come in various shapes and sizes. S-hooks are a common choice, as they can easily be attached to existing nails or screws in the wall. Adhesive hooks are also available, but be sure to choose a high-quality adhesive that can support the weight of the noren and rod, especially in humid environments. For heavier noren, consider using hooks with a wider base to distribute the weight more evenly. The style of the hook should also complement the overall design; ornate hooks can add a touch of elegance, while simple minimalist hooks can blend seamlessly into the background.
When selecting brackets or hooks, always pay attention to the weight capacity. This is especially important if you're hanging a heavy noren made of thick material. The weight capacity should be clearly stated on the packaging. If in doubt, choose brackets or hooks with a higher weight capacity than you think you'll need.
Tools You'll Need: Level, Drill (if necessary), Screwdriver
Hanging a noren is usually a quick and straightforward task. Ensure you have these basic tools readily available.
-
Level: This is arguably the most important tool, especially when installing brackets. Use a level to ensure that the brackets are perfectly aligned horizontally, guaranteeing that your noren hangs straight. Even a slight tilt can be noticeable and detract from the overall appearance. A small spirit level is sufficient for this purpose.
-
Drill (if necessary): If you're installing brackets on a hard surface like wood or concrete, you'll likely need a drill to create pilot holes for the screws. Choose a drill bit that is slightly smaller than the diameter of the screws you'll be using. Drilling pilot holes will prevent the wood from splitting and make it easier to drive the screws in straight. For concrete or brick walls, you'll need a masonry drill bit and potentially wall anchors for added stability.
-
Screwdriver: A screwdriver is essential for attaching the brackets or hooks to the wall. Use a screwdriver that is the correct size and type for the screws you're using. Over-tightening the screws can strip the threads or damage the surrounding material, so be careful not to apply too much force. A magnetic screwdriver can be helpful for preventing screws from falling. If using adhesive hooks, you will not need a drill or screwdriver, but you still need to ensure the surface is clean before applying the adhesive.
Expert Insight: Before drilling any holes, use a stud finder to locate wall studs. Anchoring the brackets directly into a stud will provide the most secure and stable support, especially for heavier noren. If you can't find a stud, use wall anchors to distribute the weight more evenly and prevent the screws from pulling out of the wall.
Alternative Hanging Methods: Tension Rods and Clips
Beyond traditional rods and brackets, there are alternative methods for hanging your noren, offering solutions for different situations and aesthetic preferences.
-
Tension Rods: These are spring-loaded rods that expand to fit snugly between two walls or doorframes. They are easy to install and require no drilling or screws, making them a great option for renters or for temporary installations — ideal for noren in apartments and rentals. Tension rods are best suited for lightweight noren, as they typically have a lower weight capacity than fixed rods. Ensure the rod is the correct length for the space. Also, consider the finish of the tension rod, which should either match or complement the noren. Some tension rods feature decorative end caps that can add a touch of style.
-
Clips: Clips provide a simple and versatile way to hang noren, particularly if the noren does not have the typical rod pocket. They attach directly to the top edge of the noren and then hang from a rod or hooks. Clips come in various styles, including alligator clips, bulldog clips, and decorative curtain clips. Choose clips that are appropriate for the thickness of the noren and the overall aesthetic you're trying to achieve. Clips are particularly useful for hanging noren made from lightweight materials, such as sheer fabrics. They also allow you to easily adjust the height of the noren by simply repositioning the clips.
When selecting a hanging method, consider both the functional requirements and the aesthetic impact. A well-chosen hanging method can enhance the beauty of your noren and create a welcoming and harmonious atmosphere in your space.
Step-by-Step Guide: How to Hang Noren Curtain with a Rod
Measuring and Marking Mounting Points for Brackets
Hanging a noren (暖簾) with a rod is a classic and elegant method, frequently seen in businesses throughout Japan, from traditional ryokan (旅館, Japanese inns) to humble ramen shops. It offers a secure and visually appealing way to display your noren. Careful planning and accurate measurements are critical for a successful installation. Before reaching for any tools, take a moment to envision the final result.
Begin by determining the desired height for your noren. Consider the purpose of the curtain. Is it intended to provide privacy, subtly define a space, or simply act as a decorative element? A noren hung higher will create a more expansive feeling, while one hung lower offers a greater sense of separation. Typical placement sees the bottom of the noren falling a comfortable 15-30 cm (6-12 inches) above the floor or threshold. This allows for easy passage and prevents the fabric from dragging, especially important in high-traffic areas.
Once you've decided on the overall height, factor in the height of your chosen brackets and the diameter of your rod. This is crucial for calculating the precise location of the mounting points. Remember to account for the saotooshi (竿通し), the rod pocket/sleeve through which the rod passes. The saotooshi adds to the overall height required. Measure the distance from the top of the saotooshi rod pocket to the bottom edge of the noren. This, combined with your desired bottom edge height, gives you the final height for bracket placement.
Using a measuring tape and a level, carefully mark the locations for your brackets on the wall or doorframe. Japanese homes often have narrower doorways than Western standards, so pay close attention to centering. A noren that’s even slightly off-center will be immediately noticeable. Use a pencil to make precise, light marks. Double-check all measurements to avoid unnecessary holes. For wider doorways, consider using a longer rod and potentially a third bracket in the center for added support, especially if the noren itself is heavy or made of a thicker weave. The center bracket prevents sagging.
Expert Insight: Before drilling any holes, use painter's tape to mark the areas where the brackets will be installed. This protects the surface and prevents chipping, especially on painted walls or delicate wallpaper.
Installing Brackets Securely (Drilling and Anchoring if needed)
Now comes the crucial step of installing the brackets. The key is stability. A wobbly bracket will not only look unsightly but also poses a risk of the noren falling.
First, identify the wall material. Are you working with drywall, plaster, wood, or concrete? This will determine the type of anchors and drill bits you need. For drywall, self-drilling anchors are often sufficient for lightweight noren. However, for heavier fabrics or high-traffic areas, consider using toggle bolts or molly bolts for a more secure hold. Wood offers a more straightforward installation; screws can often be driven directly into the wood, but pre-drilling pilot holes can prevent splitting, especially with hardwoods. Concrete or brick requires specialized masonry drill bits and concrete anchors.
Before drilling, confirm that there are no electrical wires or plumbing pipes running behind the wall at the intended mounting points. A stud finder can help locate wooden studs behind drywall, providing a more secure anchor point for your screws.
Using the appropriate drill bit for your wall material, carefully drill pilot holes at the marked locations. Ensure the holes are deep enough to accommodate the anchors. Insert the anchors into the holes, tapping them gently with a hammer if necessary. Align the brackets over the anchors and screw them securely into place. Avoid overtightening the screws, as this can strip the holes or damage the brackets.
Check the stability of each bracket individually. They should be firmly attached to the wall without any wobble. If a bracket feels loose, try using a larger anchor or reposition it slightly. A well-mounted bracket is the foundation for a beautifully hung noren.
In older Japanese homes (kominka, 古民家), walls may be uneven or made of materials like tsuchi-kabe (土壁, earthen walls). In such cases, extra care is needed. Consult with a hardware specialist to determine the best anchoring solution for your specific wall type. Sometimes, a backing board may be necessary to provide a stable and even surface for mounting the brackets.
Threading the Noren Rod Through the Noren's Header
With the brackets securely in place, it's time to thread the rod through the saotooshi (竿通し), the rod pocket/sleeve at the top of the noren. This seemingly simple step requires attention to detail to ensure a smooth and even drape.
Before you start, make sure the rod is clean and free of any dust or debris. A slightly rough surface can snag the fabric. Carefully insert one end of the rod through the first saotooshi opening. Gently guide the rod through each subsequent loop, ensuring the fabric is evenly distributed along the rod. Avoid bunching or twisting the fabric.
Japanese noren often have a specific design or pattern that needs to be properly oriented. Pay attention to the direction of the design and make sure it is facing the correct way before fully threading the rod. Some noren feature a split down the middle, a design element known as ware (割れ). Ensure the ware is centered and falls naturally when the noren is hung.
If the saotooshi rod pockets are particularly tight, consider using a thin, smooth stick or dowel to help guide the rod through the fabric. Avoid using sharp objects that could damage the noren. Once the rod is fully threaded, adjust the fabric to ensure an even distribution and a pleasing drape. The spacing between each loop should be roughly equal to prevent any sagging or bunching.
Positioning the Rod on the Brackets and Ensuring Level Alignment
The final step is to position the rod onto the brackets and ensure everything is perfectly level. This is where all your previous measurements and careful installations come together.
Carefully lift the rod, with the noren already attached, and gently place it onto the brackets. Ensure the rod is securely seated in the bracket supports. Some brackets have a locking mechanism or a lip to prevent the rod from slipping. Make sure this is properly engaged.
Step back and visually assess the noren. Does it hang straight? Is it centered correctly? Use a level to confirm that the rod is perfectly horizontal. Even a slight tilt can be distracting. If the rod is not level, you may need to make minor adjustments to the bracket positions. Loosen the screws slightly on one of the brackets and gently raise or lower it until the rod is level. Retighten the screws securely.
Once the noren is level, make any final adjustments to the drape of the fabric. Ensure the ware (割れ) split falls naturally and evenly. Adjust the spacing between the saotooshi rod pockets if necessary. A properly hung noren should be both functional and aesthetically pleasing.
Consider the lighting in the area. Sunlight can fade delicate fabrics over time. If the noren is exposed to direct sunlight, consider using a UV-protective spray to help preserve its color and vibrancy. Also, the gentle swaying of the noren in a breeze adds another layer of beauty to its charm.
Finally, appreciate your work. You have successfully installed a noren curtain using a rod, bringing a touch of Japanese culture and elegance to your space. The soft texture and subtle design elements creates a welcoming atmosphere, a reminder of the simple beauty found in everyday Japanese life.
Hanging Noren Without a Rod: Creative and Easy Solutions
While a traditional rod offers a classic and secure way to display your noren (暖簾), sometimes drilling holes isn't feasible or desired. Perhaps you're renting, want a temporary solution, or simply prefer a different aesthetic. Luckily, there are several clever and renter-friendly methods to hang your noren without relying on a rod. These techniques offer flexibility and a unique touch to your space.
Using Clips: Attaching Noren Directly to Existing Structures
One of the simplest approaches involves using clips to attach your noren directly to existing structures. This works well for doorways, windows, or even shelves. The key is choosing the right type of clip for the weight and thickness of your noren, as well as the surface you're attaching it to.
Consider these clip options:
-
Binder Clips: These are a budget-friendly and readily available choice, especially for lighter-weight noren. Choose clips that are appropriately sized for the width of the noren's header (the top portion with the rod pocket). For a standard noren with a reinforced header, large binder clips (approximately 5 cm or 2 inches wide) work well. You can distribute the clips evenly along the header, typically placing one every 15-20 cm (6-8 inches) for even weight distribution. Hide the clips by folding the top of the noren over before clipping, creating a clean, finished look.
-
Curtain Clips with Rings: These clips have small rings attached, allowing you to hang the noren from hooks or nails if needed. However, the clips themselves can also be used directly. The teeth of the clips grip the noren fabric securely. Measure the diameter of any existing rod or nail you might want to use with the rings to ensure a proper fit before purchasing. The clipping strength also depends on the material, so test in an inconspicuous area first.
-
Alligator Clips: Alligator clips have serrated jaws that provide a strong grip. These are suitable for heavier noren or those made from thicker material. Opt for clips with rubber tips to prevent damage to the fabric. These are very secure, but keep in mind that they create small crimp marks on the noren which might be noticeable.
-
Bulldog Clips: Similar to binder clips but generally smaller and stronger, bulldog clips are good for neatly displaying smaller noren, or for when you only need to attach to a thin structure.
When using clips, consider the overall aesthetic. Silver or black clips offer a more modern look, while wooden or decorative clips can complement a traditional or rustic style. For a more seamless appearance, choose clips that match the color of your noren.
Expert Insight: For delicate fabrics, place a small piece of felt or fabric between the clip and the noren to prevent damage. This is especially useful for vintage noren or those with intricate embroidery (shishu, 刺繡).
Employing Tension Rods: A No-Drill Solution for Narrow Openings
Tension rods provide a stable and adjustable solution for hanging noren without any drilling. These rods use spring tension to stay securely in place between two surfaces. They are ideal for narrow doorways, hallways, or window frames.
To use a tension rod, follow these steps:
- Measure the Opening: Accurately measure the width of the opening where you want to hang the noren.
- Choose the Right Size Rod: Select a tension rod that is slightly longer than your measurement. Most tension rods are adjustable within a certain range. For example, a rod that adjusts from 70 cm to 120 cm (28 to 47 inches) would be suitable for an opening between those measurements.
- Insert the Rod: Compress the tension rod and insert it into the opening. Make sure the rod is level.
- Adjust the Tension: Slowly release the tension rod, allowing it to expand and grip the sides of the opening. Twist the rod until it is securely in place and can support the weight of your noren.
- Hang the Noren: Slide the noren onto the tension rod through the rod pocket.
- Fine-tune: Check for sag or tilt. Re-adjust the tension and position as necessary.
For lightweight noren, a standard tension rod will suffice. However, for heavier noren, consider using a heavy-duty tension rod designed to support more weight. Look for rods with rubber or silicone grips on the ends to prevent slippage and protect the surface of the opening.
Expert Insight: To prevent the tension rod from damaging painted surfaces, place small pieces of felt or rubber padding between the rod ends and the wall.
Creating a DIY Hanging System with Twine or Cord
For a rustic or minimalist look, consider creating a DIY hanging system using twine or cord. This method is particularly well-suited for lighter-weight noren and adds a touch of handcrafted charm to your space.
Here's how to create a simple twine hanging system:
- Choose Your Cord: Select a sturdy twine or cord that complements the style of your noren. Natural fibers like hemp (asa) or cotton cord offer a traditional Japanese aesthetic. Jute rope is also a good choice for a more rugged look.
- Measure and Cut: Measure the desired length of the cord. You'll need enough cord to span the opening and provide sufficient length for hanging. Add extra length for tying knots. A good rule of thumb is to double the width of the opening and add an additional 30 cm (12 inches) on each side for tying.
- Attach to Noren: Thread the cord through the rod pocket of the noren.
- Create Hanging Loops: Tie loops at each end of the cord, leaving enough slack to allow the noren to hang freely.
- Secure to Wall or Door Frame: Hang the loops from hooks, nails, or even sturdy adhesive hooks on the wall or door frame. Ensure the hooks are level and securely attached.
- Adjust and Secure: Adjust the position of the noren along the cord until it hangs evenly. You can add small beads or knots along the cord to further secure the noren and prevent it from sliding.
For a more elaborate DIY hanging system, consider using decorative wooden dowels or bamboo poles in conjunction with the twine or cord. This creates a more structured and visually appealing display.
Expert Insight: Experiment with different knots and weaving techniques to add a unique touch to your DIY hanging system. Macrame knots, for example, can create a beautiful and decorative border.
Adhesive Hooks: Pros, Cons, and Best Practices for Noren Hanging
Adhesive hooks offer a convenient and damage-free way to hang your noren, particularly if you are in a rental or want to avoid drilling. However, it's crucial to choose the right type of hook and follow best practices to ensure a secure and long-lasting hold.
Pros:
- Easy Installation: Adhesive hooks are incredibly easy to install. Simply peel off the backing and stick them to the desired surface.
- Damage-Free: When removed properly, adhesive hooks shouldn't damage walls or door frames.
- Versatile: Available in a wide range of sizes, styles, and weight capacities, making them suitable for various noren types.
- Affordable: Adhesive hooks are generally inexpensive and readily available.
Cons:
- Weight Limitations: Adhesive hooks have weight limitations. Exceeding the recommended weight capacity can cause the hook to fail, potentially damaging the noren.
- Surface Compatibility: Adhesive hooks may not adhere well to all surfaces. Textured walls, rough surfaces, or walls with peeling paint can compromise the hook's grip.
- Temperature Sensitivity: Extreme temperatures and humidity can affect the adhesive's performance.
- Potential for Residue: Some adhesive hooks may leave behind a sticky residue when removed.
Best Practices:
- Choose the Right Hook: Select adhesive hooks specifically designed for the weight of your noren. Check the packaging for the weight capacity and ensure it exceeds the noren's weight.
- Prepare the Surface: Thoroughly clean the surface with rubbing alcohol to remove any dirt, dust, or grease. Allow the surface to dry completely before applying the hook.
- Apply Firm Pressure: Press the adhesive hook firmly against the surface for the recommended amount of time (usually 30-60 seconds). This ensures a strong bond.
- Allow Curing Time: Wait the recommended curing time (usually 24-48 hours) before hanging your noren. This allows the adhesive to fully set.
- Distribute Weight Evenly: If using multiple hooks, space them evenly along the width of the noren to distribute the weight.
- Remove Carefully: To remove the hook, gently pull downwards, parallel to the wall. Avoid pulling outwards, as this can damage the surface. If residue remains, use a mild adhesive remover.
When using adhesive hooks, it's always best to err on the side of caution. Choose hooks with a higher weight capacity than you think you need, and follow the manufacturer's instructions carefully. Regularly inspect the hooks to ensure they are still securely attached.
Troubleshooting Common Noren Hanging Problems
Hanging a noren (暖簾) might seem straightforward, but sometimes things don't go quite as planned. Don't despair! Even seasoned noren enthusiasts occasionally encounter challenges. This section provides solutions for common issues, helping you achieve that perfect, authentic Japanese aesthetic.
Noren Sagging or Slipping: Adjusting Rod Placement and Tension
A sagging or slipping noren, especially over a doorway, can be both unsightly and inconvenient. The primary culprit is usually insufficient tension on the rod or improper bracket placement. Think of it like ikebana (生け花, flower arranging): a delicate balance is crucial.
First, consider the weight of your noren. Heavier fabrics, like thick cotton or those with substantial dyeing, require more robust support. A flimsy, telescoping rod might simply buckle under the pressure. Before making further adjustments, ensure your rod is appropriately rated for the noren's weight. Check the rod's documentation or packaging, if available. If you're unsure, opt for a sturdier, fixed-length rod.
Next, examine the rod's extension. Telescoping rods rely on friction to stay in place. Over-extension weakens this friction, increasing the likelihood of slippage. Try reducing the extension of the rod, even if it means slightly narrowing the covered space. Even a centimeter or two can make a difference.
Another adjustment you can make is the placement of the mounting brackets. Ideally, brackets should be positioned close to the ends of the rod, within approximately 5-7 centimeters (2-3 inches) of the end caps. This provides maximum support and minimizes leverage on the rod itself. The closer to the ends, the less likely the rod is to flex downwards in the center.
If the rod is slipping horizontally within the brackets, even with sufficient tension, consider adding a small strip of non-slip material, such as rubber or silicone tape, between the rod and the bracket. This will increase friction and prevent unwanted movement. You can find these at most hardware stores or even repurpose a small piece of drawer liner. In a pinch, even a folded piece of paper can provide temporary grip, though it’s not a long-term solution.
For doorways with uneven jambs, shims can be essential. Small wedges of wood or plastic, available at hardware stores, can be inserted behind the brackets to level them out. This ensures the rod is perfectly horizontal, distributing the noren's weight evenly and preventing sagging. A spirit level (suiheiki, 水平器) is indispensable for this task.
Finally, think about the surface on which the brackets are mounted. Smooth, painted surfaces can be slippery. If this is the case, consider using brackets with textured backing or adding a small amount of adhesive putty to the back of the bracket (avoiding the screw holes, of course) for extra grip.
Uneven Hanging Height: Correcting Imbalances and Re-Measuring
An uneven noren is like a crooked torii (鳥居) – it just doesn't feel right. Several factors can contribute to this problem, but careful re-measurement is almost always the first step towards a solution.
Begin by re-measuring the height of your doorway or the space where the noren is hung at multiple points. Use a reliable measuring tape and double-check your measurements to ensure accuracy. Discrepancies of even a few millimeters can become noticeable once the noren is in place.
If you’re using adhesive hooks for a temporary or rodless setup (as described in previous sections), ensure they are perfectly aligned horizontally. Use a level, or a laser level if you have one, to guarantee accuracy. Mark the intended locations of the hooks with a pencil before adhering them to the surface. A common trick is to use painter's tape to create a straight line as a guide.
When using a rod, make sure the brackets are mounted at the same height on both sides. Again, a spirit level is your best friend here. If the brackets are already mounted and uneven, you might be able to adjust the height of the noren slightly by manipulating the way it drapes over the rod, but this is usually only effective for minor discrepancies.
Sometimes, the noren itself might be slightly uneven due to manufacturing variations. This is more common with handmade or vintage noren. In such cases, you might need to make minor adjustments to the loops or slits at the top of the noren that attach to the rod. For example, you could slightly enlarge a loop on one side to raise that side of the noren. Be extremely careful when altering the fabric, as irreversible damage can occur.
If using clips, ensure each clip is holding the fabric at the same distance from the top edge of the noren. Even slight variations in clip placement can result in a noticeable unevenness. Use a ruler or measuring tape to ensure consistent clip placement.
Consider the visual impact of the surrounding environment. A slightly uneven floor, a crooked wall, or even the placement of nearby furniture can all contribute to the illusion of an uneven noren, even if the noren itself is perfectly level. Sometimes, simply adjusting the surrounding elements can solve the problem.
Expert Insight: For particularly stubborn cases of uneven hanging, try using a laser level to project a perfectly horizontal line across the entire doorway or opening. This provides a clear visual reference for aligning your brackets or hooks and ensures that your noren hangs perfectly straight.
Loose or Unstable Mounting Brackets: Tightening Screws and Anchors
Wobbly mounting brackets are a sign that something isn’t quite right. Ignoring this issue can lead to the noren falling down entirely, potentially damaging the noren itself or the surrounding area.
The first step is always to tighten the screws. Use a screwdriver that is the correct size for the screw head to avoid stripping the screw. Turn the screws clockwise until they are snug, but be careful not to overtighten them, as this can damage the bracket or the surrounding material.
If tightening the screws doesn't solve the problem, the screw holes might be stripped. This means the screws are no longer able to grip the material properly. In this case, you’ll need to use wall anchors.
Wall anchors provide a more secure hold for screws in drywall, plaster, or other soft materials. There are many different types of wall anchors available, including plastic anchors, metal anchors, and self-drilling anchors. Choose an anchor that is appropriate for the type of wall you are working with and the weight of the noren.
To install a wall anchor, first drill a hole in the wall that is the correct size for the anchor. Insert the anchor into the hole and then insert the screw into the anchor. Tighten the screw until the anchor is firmly seated in the wall.
For heavier noren or for situations where the brackets are subjected to a lot of stress (e.g., in a high-traffic doorway), consider using toggle bolts instead of standard wall anchors. Toggle bolts provide an even stronger hold, as they use a wing-like mechanism that expands behind the wall to distribute the weight.
If the brackets are mounted on wood, and the screws are still loose after tightening, the wood itself might be damaged or rotten. In this case, you might need to replace the damaged wood or use longer screws that can reach into solid wood. As a temporary measure, you can insert small wooden toothpicks or matchsticks into the screw hole before re-inserting the screw. This will provide the screw with something to grip onto.
Inspect the brackets themselves for any signs of damage, such as cracks or bends. If the brackets are damaged, they should be replaced. Using damaged brackets can be dangerous, as they might fail unexpectedly.
Noren Too Long or Short: Hemming or Adding Fabric to Adjust Length
Ideally, you've measured carefully and your noren fits perfectly. But sometimes, a noren arrives and the length isn’t quite right. Perhaps it drags on the floor, collecting dust and dirt. Or maybe it’s too short, leaving an unsightly gap. Fortunately, there are solutions, though they require a bit of skill and care.
If the noren is too long, hemming is the most common solution. Hemming involves folding over the bottom edge of the fabric and sewing it in place to shorten the overall length. If you're comfortable with a sewing machine (mishin, ミシン), this is a relatively straightforward process. If not, consider taking it to a tailor or seamstress (nuiko-san, 縫子さん).
Before hemming, carefully measure how much fabric needs to be removed. It’s always better to err on the side of caution and remove less fabric than you think you need. You can always hem it again if it’s still too long, but you can’t undo a hem that’s too short.
When hemming, use a thread that matches the color of the noren fabric. A contrasting thread will be very noticeable and detract from the overall aesthetic. Also, use a stitch length that is appropriate for the fabric. A shorter stitch length is generally better for delicate fabrics, while a longer stitch length is better for heavier fabrics.
If the noren is too short, adding fabric is a more challenging, but not impossible, solution. This involves attaching a strip of fabric to the bottom edge of the noren to increase its length.
When adding fabric, choose a fabric that is similar in color, weight, and texture to the original noren fabric. A mismatched fabric will look out of place and detract from the overall aesthetic.
You can attach the fabric using a sewing machine or by hand-sewing. If using a sewing machine, use a straight stitch and backstitch at the beginning and end of each seam to secure the fabric. If hand-sewing, use a small, even stitch and be sure to knot the thread securely.
Another approach is to add a decorative border to the bottom of the noren. This can be a great way to add some visual interest to the noren while also increasing its length. You can use a variety of materials for the border, such as ribbon, lace, or even another piece of fabric. Be mindful of the overall wabi-sabi (侘寂) aesthetic – imperfections can add to the charm, but blatant mismatches should be avoided.
For simpler noren, consider adding fringe or tassels to the bottom. While this doesn't technically add fabric in the traditional sense, it can visually lengthen the noren and add a touch of elegance. Choose fringe or tassels that complement the noren's color and style.
Maintaining Your Noren: Cleaning and Care Tips
A noren (暖簾), more than just a piece of fabric, is a reflection of your space's personality and often, a symbol of the establishment it adorns. Proper care ensures its longevity and preserves its aesthetic appeal — for detailed washing and storage instructions, see our noren care and washing guide. Neglecting its upkeep can lead to fading, damage, and a less-than-inviting appearance. Consider these guidelines to keep your noren looking its best, reflecting positively on your home or business.
Washing Instructions: Hand-Washing vs. Machine-Washing Guidelines
While convenience might tempt you toward machine washing, hand-washing is often the gentler, preferable approach, especially for delicate or vintage noren. When deciding, consider the fabric's weave and the presence of any embellishments. A looser weave is more prone to shrinkage in a machine. Beaded or intricately stitched designs are best preserved through hand-washing.
Hand-Washing:
- Fill a clean basin or tub with lukewarm water. Avoid hot water, as it can cause colors to run or fabrics to shrink.
- Add a mild, pH-neutral detergent specifically designed for delicate fabrics. In Japan, many prefer using arau (洗う) detergents, known for their gentle cleansing action. Dissolve the detergent completely before immersing the noren.
- Gently submerge the noren and swish it around, avoiding harsh scrubbing or twisting. Focus on areas with visible dirt or stains, but treat them delicately.
- Let the noren soak for approximately 15-20 minutes. This allows the detergent to lift away dirt and grime.
- Drain the soapy water and refill the basin with clean, lukewarm water. Rinse the noren thoroughly, repeating the process until all traces of detergent are gone.
- Gently press out excess water. Avoid wringing, as this can distort the fabric and damage its fibers. You can roll the noren in a clean towel to absorb more water.
Machine-Washing (Use with Caution):
If you choose to machine wash, take these precautions:
- Use a mesh laundry bag to protect the noren from snagging or tearing.
- Select the delicate or hand-wash cycle with cold water.
- Use a mild, pH-neutral detergent designed for delicate fabrics.
- Avoid using bleach or fabric softeners. Bleach can damage the fabric and fade colors, while fabric softeners can leave a residue.
- Set the spin cycle to the lowest setting to minimize wrinkling and stress on the fabric.
- Remove the noren immediately after the cycle is complete to prevent wrinkles from setting in.
Drying Noren: Air-Drying vs. Tumble-Drying Considerations
The way you dry your noren is just as important as how you wash it. Tumble drying is generally discouraged, as the high heat can cause shrinkage, fading, and damage to the fabric fibers. Air-drying is the gentler, more recommended method.
Air-Drying:
- Gently reshape the noren while it is still damp. This helps to prevent wrinkles and maintain its original shape.
- Hang the noren on a padded hanger or clothesline in a well-ventilated area away from direct sunlight. Direct sunlight can cause colors to fade. If you must dry it outdoors, choose a shaded spot.
- Ensure the noren is hanging straight to prevent it from stretching or distorting.
- Allow the noren to dry completely before storing or rehanging it. This may take several hours or even a day, depending on the humidity and the thickness of the fabric.
Tumble-Drying (Not Recommended, but Possible with Extreme Caution):
If absolutely necessary, you can tumble dry, but ONLY if the fabric is pre-shrunk and you follow these guidelines very closely:
- Use the lowest heat setting possible.
- Tumble dry for a very short time, checking the noren frequently to prevent over-drying.
- Remove the noren while it is still slightly damp and hang it up to finish air-drying.
Expert Insight: Consider using a drying rack indoors during rainy seasons like tsuyu (梅雨) in June and July to ensure proper air circulation and prevent mildew growth on your noren.
Ironing and Wrinkle Removal Techniques for Different Fabrics
Even with careful washing and drying, some wrinkles may still appear. Ironing can help to restore the noren to its original smoothness and appearance. However, it's crucial to use the correct ironing technique for the specific type of fabric.
- Check the care label for specific ironing instructions. If there is no label, start with a low heat setting and gradually increase it until you find the right temperature.
- Iron the noren while it is still slightly damp. This will help to remove wrinkles more easily.
- Use a pressing cloth between the iron and the noren to protect the fabric from direct heat. A clean cotton cloth works well.
- Iron in a straight, even motion, avoiding circular movements.
- For delicate fabrics, such as silk or rayon, use a cool iron setting and a pressing cloth.
- For stubborn wrinkles, use a steam iron or spray the noren with water before ironing.
Alternatives to Ironing:
If you prefer to avoid ironing, consider these alternatives:
- Steaming: Use a garment steamer to gently remove wrinkles from the noren. Hang the noren and steam it from top to bottom, keeping the steamer a few inches away from the fabric.
- Hanging in a Steamy Bathroom: Hang the noren in a steamy bathroom while you take a shower. The steam will help to relax the fibers and remove wrinkles.
- Wrinkle Release Spray: Use a commercial wrinkle release spray to loosen the fibers and allow wrinkles to fall out naturally.
Preventative Measures: Protecting Noren from Fading and Damage
Prevention is the best medicine when it comes to maintaining your noren. By taking some simple precautions, you can extend its lifespan and keep it looking its best for years to come.
- Avoid Direct Sunlight: Prolonged exposure to direct sunlight can cause colors to fade. Hang your noren in a shaded area or use curtains or blinds to filter the sunlight.
- Protect from Moisture: Moisture can lead to mildew growth and damage the fabric. Avoid hanging your noren in damp areas or near sources of moisture. If it does get wet, dry it immediately.
- Regular Dusting: Dust your noren regularly with a soft brush or vacuum cleaner with a brush attachment to remove dust and dirt particles. This will help to prevent them from becoming embedded in the fabric.
- Proper Storage: When not in use, store your noren in a clean, dry place away from direct sunlight and moisture. Fold it neatly and place it in a breathable storage bag or container. Avoid using plastic bags, as they can trap moisture and lead to mildew growth. It's wise to use tatoushi (畳紙), special paper for kimono storage, to gently wrap the noren before placing it in storage.
- Pest Control: Be mindful of moths and other pests that can damage fabric. Use cedar balls or lavender sachets in your storage area to repel pests.
- Professional Cleaning: For delicate or valuable noren, consider professional cleaning. A professional cleaner will have the expertise and equipment to clean your noren safely and effectively.
- Regular Inspection: Periodically inspect your noren for signs of damage, such as tears, stains, or fading. Address any problems promptly to prevent them from worsening. Simple repairs, like mending a small tear, can significantly extend the noren's life.
- Rotation: If you use noren seasonally, rotating them ensures even wear and minimizes prolonged exposure to environmental factors. Store out-of-season noren properly as described above.
Creative Noren Uses Beyond Doorways: Expanding its Function
While noren (暖簾) traditionally grace doorways, their versatility extends far beyond marking entrances. From subtly redefining a room's layout to becoming captivating art pieces, the noren (暖簾) offers a unique blend of practicality and aesthetic charm. Let’s explore how to embrace its potential in unexpected ways.
Using Noren as Room Dividers: Creating Privacy and Defining Spaces
In Japan, where space is often at a premium, noren (暖簾) have long served as effective, yet unobtrusive room dividers. If this use case interests you, our full guide on using noren as room dividers covers it in depth. This approach offers a softer, more flexible alternative to solid walls or bulky screens, allowing light and air to circulate while still creating a sense of separation.
Consider a studio apartment where you want to delineate a sleeping area from the living space. A strategically placed noren (暖簾) can visually separate the zones without making the apartment feel smaller or closed-off. Using a longer noren (暖簾), perhaps reaching near the floor, enhances the sense of enclosure.
Open-plan homes can also benefit from this application. A noren (暖簾) can define a home office area within a larger living room, or separate a dining area from a kitchen without completely isolating it. The transparency of the fabric allows for a connection between the spaces, while still providing a degree of privacy.
When using noren (暖簾) as room dividers, carefully consider the positioning and the type of rod used. For wider spans, a sturdier, perhaps even custom-made rod is essential to prevent sagging. The height at which you hang the noren (暖簾) also influences its effectiveness as a divider. Hanging it higher creates a more open feel, while hanging it lower provides greater privacy. Think about the natural flow of movement in your space, and hang the noren (暖簾) in a way that complements, rather than obstructs, that flow.
In traditional Japanese homes, you might see noren (暖簾) used to separate the tatami (畳) mat room from the genkan (玄関, entrance area). This creates a visual cue, signaling a transition between public and private space.
Expert Insight: For added sound dampening when using a noren (暖簾) as a room divider, choose a thicker fabric or layer two noren (暖簾) together. This can subtly reduce noise transmission between spaces.
Noren as Window Treatments: Diffusing Light and Adding Style
Beyond their traditional role at doorways, noren (暖簾) make captivating and functional window treatments. They offer a softer, more organic alternative to blinds or heavy curtains, gently diffusing sunlight and adding a touch of Japanese aesthetic to your interior.
A noren (暖簾) hung in a window can filter harsh sunlight, creating a warm and inviting atmosphere. The fabric's texture plays a crucial role here. A loosely woven linen noren (暖簾) will allow more light to pass through, creating dappled patterns, while a denser cotton noren (暖簾) will provide more shade.
The length of the noren (暖簾) is also important. A shorter noren (暖簾) that covers only the upper portion of the window can allow ample light while providing privacy from street-level views. A longer noren (暖簾) can be used to cover the entire window, offering greater privacy and light control.
Consider the existing décor of your room when choosing a noren (暖簾) for your windows. A noren (暖簾) featuring traditional Japanese motifs can complement a minimalist aesthetic, while a more contemporary design can add a unique accent to a modern space.
Using a noren (暖簾) as a window treatment is particularly effective in spaces where you want to maintain a connection to the outdoors. The light filtering through the fabric creates a sense of openness, blurring the lines between interior and exterior. Imagine a noren (暖簾) hanging in a sunroom, gently swaying in the breeze and filtering the sunlight.
Unlike typical curtains that are often drawn completely open or shut, noren (暖簾) offer adjustable light and privacy depending on how they are split.
Repurposing Noren as Wall Art: Displaying Unique Designs
Transforming a noren (暖簾) into wall art is a fantastic way to showcase its unique design and add a touch of Japanese artistry to your home. This approach allows you to appreciate the intricate patterns and craftsmanship of the noren (暖簾) without necessarily using it for its traditional function.
To display a noren (暖簾) as wall art, you can use a variety of methods. Stretching it over a wooden frame, similar to a canvas, creates a clean and modern look. Alternatively, hanging it directly on the wall using decorative tacks or clips can create a more relaxed and bohemian vibe.
The size and design of the noren (暖簾) will influence its impact as a wall art piece. A larger noren (暖簾) can serve as a statement piece, while a smaller one can be grouped with other art objects to create a gallery wall. Consider the color palette of your room and choose a noren (暖簾) that complements or contrasts with the existing décor.
A noren (暖簾) featuring calligraphy or traditional Japanese paintings can add a touch of elegance and sophistication to a room. A noren (暖簾) with bold geometric patterns can bring a contemporary edge to a space.
Think about the placement of the noren (暖簾) in relation to the lighting. A well-lit noren (暖簾) will showcase its colors and textures more effectively. Experiment with different lighting angles to create interesting shadows and highlights.
In Japan, it's common to see antique or vintage noren (暖簾) displayed as treasured family heirlooms. These pieces often tell a story, reflecting the history and traditions of a particular region or craft.
Noren in Businesses: Communicating Style and Signaling Open/Close
While noren (暖簾) have a strong association with homes, they play a vital role in communicating a business's style and whether it's open or closed for business. Traditionally, a noren (暖簾) hanging at the entrance of a shop or restaurant signifies that it is open and welcoming customers.
Beyond this practical function, noren (暖簾) serve as a visual representation of the business's identity. The design, color, and fabric of the noren (暖簾) can convey a sense of the establishment's ambiance and the type of goods or services offered.
For example, a traditional soba (蕎麦, buckwheat noodle) restaurant might display a noren (暖簾) with simple calligraphy indicating its name, creating a sense of authenticity and tradition. A modern café might opt for a noren (暖簾) with a more contemporary design, reflecting its trendy and innovative atmosphere.
In Japan, the act of hanging the noren (暖簾) in the morning is a symbolic gesture, signifying the start of the business day. Taking it down at the end of the day signals that the business is closed. This daily ritual reinforces the noren's (暖簾) role as a marker of time and activity.
Businesses also use noren (暖簾) internally, creating private spaces within a larger establishment. A noren (暖簾) can separate the kitchen from the dining area in a restaurant, or create a private fitting room in a clothing store.
Restaurants might use noren (暖簾) with depictions of their specialties. A sushi shop may use a noren (暖簾) displaying illustrations of fish, whereas a ramen shop may illustrate bowls of ramen.
The placement of the noren (暖簾) is critical. It should be positioned in a way that is easily visible to potential customers. The length of the noren (暖簾) should also be appropriate for the doorway, ensuring that it doesn't obstruct traffic flow. Often a slightly shorter noren (暖簾) allows for the floor to be visible, giving a visual cue to customers that invites them in.